How to run and operate a TCPP node: composing schema-driven requests, exchanging
signed frames with other nodes, replying to what arrives, and managing identities, peers
and records.
Click any figure to enlarge it.
Schema 1.3.0
27 request/response pairs, one shared envelope.
ES384
Every frame is a compact JWS over ECDSA P-384.
One binary
App, schemas and examples compiled in. Nothing to install.
What a node is
A TCPP node is a single executable. Start it and it does two things at
once: it serves a schema-driven web application in your browser, and it listens for TCPP
frames from other nodes over TLS. Everything it needs is compiled into the binary: the
1.3.0 JSON schemas, the shipped example payloads and the browser application itself.
Nothing else has to be installed, and it reaches out to nothing on the internet.
The unit of work is a frame: one TCPP message, signed by the sending
node as a compact JWS (a JWT) and posted to a peer. The node records every frame it
sends and every frame it receives in an append-only log next to the binary, with the
payload, the raw token, who it came from and whether the signature checked out.
What you can do with it
Compose any of the 27 TCPP request types from a form generated out of the schema.
Sign and send it to another node, and watch it arrive there live.
Answer a received request from a reply form that is pre-filled from the request.
Keep tuned payloads as named records and re-send them later.
Hold peers' public keys and have every stored frame verified against them.
Read back the full history: payload, token, JOSE header, transport result.
One binary also covers every arrangement you are likely to need while working on TCPP.
The node can:
Exchange frames with itself, so that a single instance is enough for a complete round trip. With no --peer given, its own address is the default target.
Exchange frames with further nodes on the same host, each started on a port of its own.
Exchange frames with nodes on other hosts across the network. If nothing arrives, the firewall is the first thing to check.
Load the shipped example payloads, and save and reload test data of your own.
Create its own key pair, and fetch peers' public keys from them directly, which comes into its own inside an established PKI.
Stand in as the counterpart while you develop and test a TCPP implementation of your own.
Getting started
What you were given
One executable, and nothing else. There is no installer, no runtime to put in place
first and no configuration file to write: put it in a directory of its own and start it.
The download is built for one operating system and one processor, so pick the file that
matches the machine you are on:
File
Runs on
tcpp-node-windows-amd64.exe
Windows, Intel or AMD processor (the usual one)
tcpp-node-windows-arm64.exe
Windows on ARM
tcpp-node-linux-amd64
Linux, Intel or AMD
tcpp-node-linux-arm64
Linux on ARM, a Raspberry Pi or an ARM server
tcpp-node-darwin-amd64
macOS, Intel
tcpp-node-darwin-arm64
macOS, Apple Silicon (M1 and later)
They are the same program; only the machine code differs. Each is self-contained, with
no libraries to install beside it and nothing to unpack, and none of them reaches out to
the internet. Rename the one you downloaded to tcpp-node
(tcpp-node.exe on Windows), which is how this manual writes it throughout.
Give it a directory you can find again. Everything the node creates (its key, its
certificate, its frame log, its records) is written next to the executable, so the
directory is the node.
Run
Start it with no arguments and it listens on port 8443.
Windows
In PowerShell or cmd, from the node's directory. Double-clicking it works
too, but then the window closes with the node and you never see why it stopped.
.\tcpp-node.exe
macOS and Linux
A downloaded file is not executable yet, so mark it once:
chmod +x tcpp-node
./tcpp-node
The download is unsigned
It carries no code-signing certificate, so each system objects once, on the first
start only:
Windows. SmartScreen says the publisher is unknown:
More info → Run anyway. If it refuses outright, the file is marked as
coming from the internet: right-click → Properties → Unblock, then
OK.
macOS. Gatekeeper blocks it: open the containing folder,
right-click the file → Open and confirm, or clear the mark with
xattr -d com.apple.quarantine tcpp-node.
Linux. Nothing objects; chmod +x is all it needs.
From there on it is the same program everywhere. The first run creates an identity and
prints what it is about to serve:
2026/09/03 18:03:48 created C:\Users\User\tcpp-lab\a\tcpp-key.pem
2026/09/03 18:03:48 created C:\Users\User\tcpp-lab\a\tcpp-cert.pem
2026/09/03 18:03:48 TCPP node CSU / P:NODE-9BED6853
2026/09/03 18:03:48   listening   https://localhost:8443/
2026/09/03 18:03:48   advertising localhost:8443
2026/09/03 18:03:48   signing     ES384, kid 9bed6853
2026/09/03 18:03:48   identity    C:\Users\User\tcpp-lab\a
2026/09/03 18:03:48   frames      0 replayed from tcpp-frames.jsonl
2026/09/03 18:03:48   schemas     27 endpoints
2026/09/03 18:03:48   records     63 in C:\Users\User\tcpp-lab\a\records
2026/09/03 18:03:48   target      localhost:8444
2026/09/03 18:03:48 The certificate is self-signed, so the browser will warn once.
Open https://localhost:8443/. The certificate the node generated for
itself is self-signed, so the browser interrupts once with a privacy warning; continue
past it (in Chrome: Advanced → Proceed). The warning does not come back for that
host until the node is given a new certificate.
The node has no login
Nothing in the HTTP interface is authenticated. Anyone who can reach the port can read
the frame log, save records, change peers and send frames as this node. Run it on a
network you trust (a laptop, a lab segment, a private VPN), not on a public address.
What appears on disk
All state lives beside the binary (or in --data-dir). A node is a directory
you can copy.
File
Contents
Mode
tcpp-key.pem
ECDSA P-384 private key, PKCS#8; the secret
0600
tcpp-cert.pem
self-signed certificate for the same key, valid 10 years
0644
tcpp-node.json
this node's TCPP type and id
0644
tcpp-frames.jsonl
every frame sent and received, one JSON object per line
0644
tcpp-peers.json
known peers and their public keys
0644
records/
the record library, <schema>/<name>.json
0755
The one-node smoke test
You do not need a second node to try the round trip. With no --peer the
default target is localhost:<port>, this node itself, so a frame it
signs is delivered to its own inbox. Open Compose, pick
ping, press Load… → example, then
Sign & Send. It appears under Inbox
immediately.
The two-node lab used in this manual
Every screenshot in this manual comes from two nodes on one machine: A,
a Charge Switch Unit on port 8443, and B, a Trusted Management Host on
port 8444. Each has its own directory, so each has its own key, log and records.
# macOS and Linux: two directories, one copy of the binary in each
mkdir a b
cp tcpp-node a/ && cp tcpp-node b/

# terminal 1
a/tcpp-node --port 8443 --node-type CSU --peer localhost:8444
# terminal 2
b/tcpp-node --port 8444 --node-type TMH --peer localhost:8443
Open https://localhost:8443/ and https://localhost:8444/ in two
browser tabs and you can watch both sides of an exchange at once.
The window
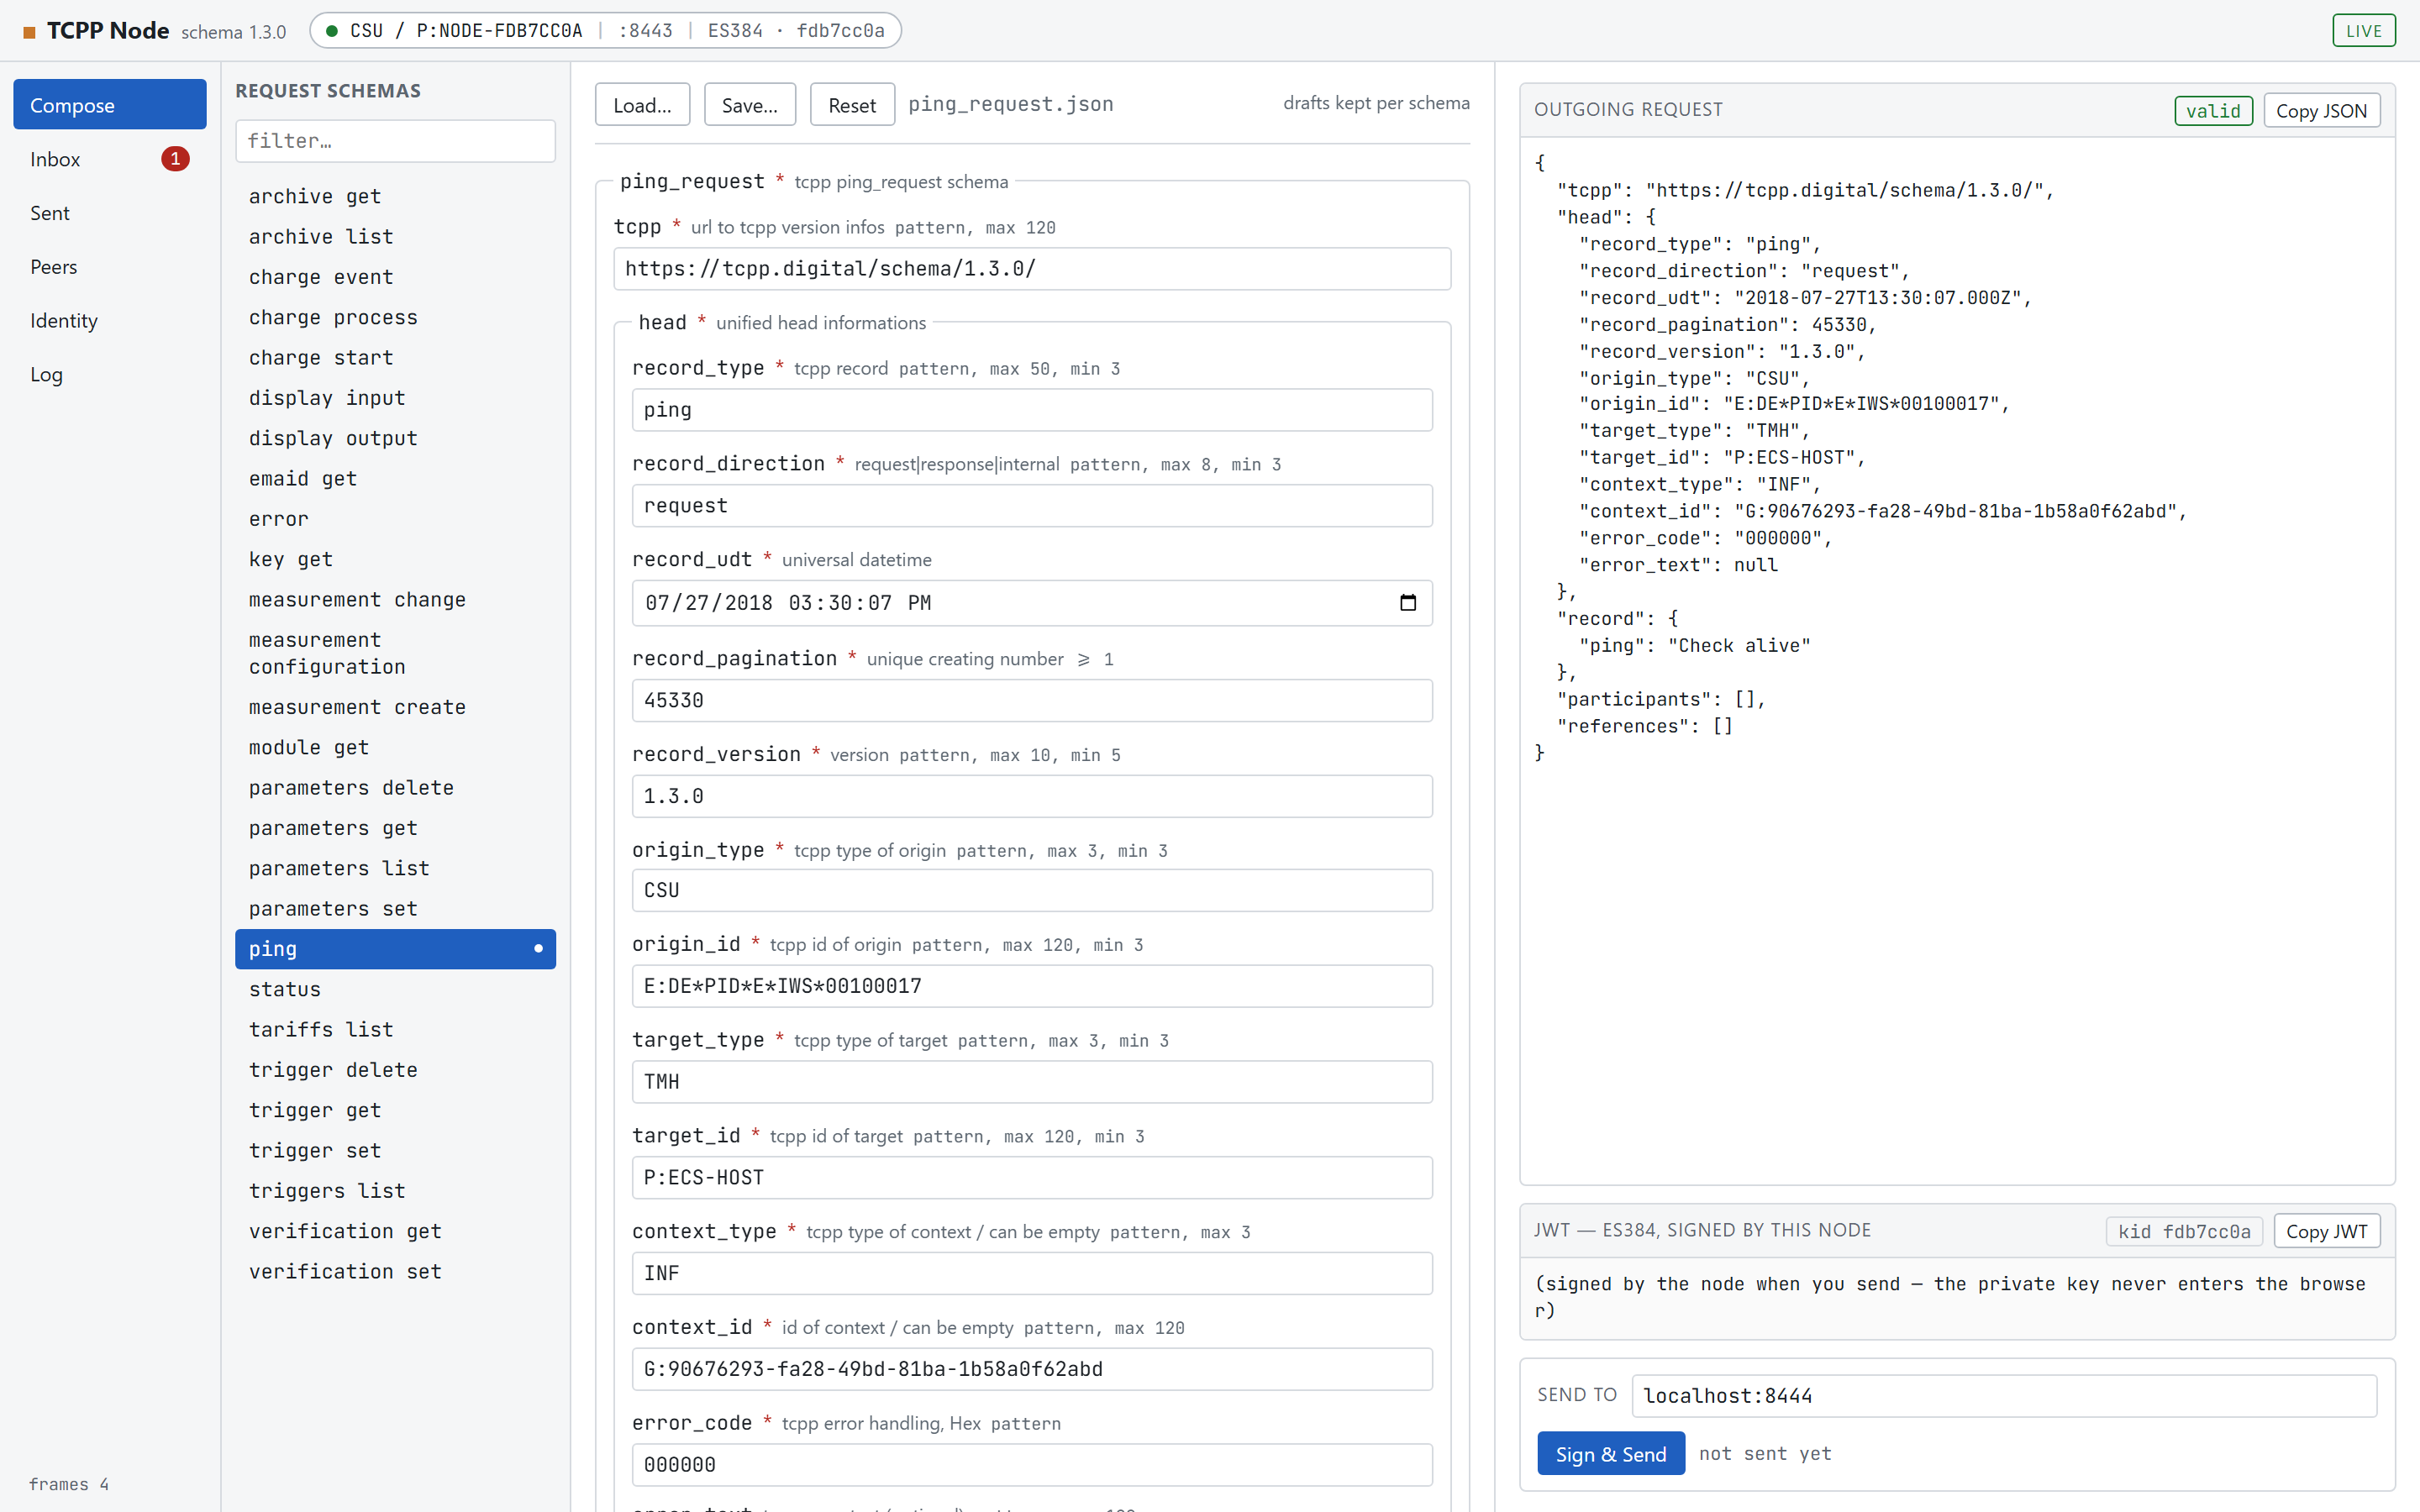
The whole application. The header identifies the node, the rail on the left switches
views, and the three columns belong to Compose.
Header
The chip at the top always names the node you are looking at, which matters once two tabs are open:
CSU / P:NODE-9BED6853 is the node's TCPP module type and id.
:8443 is the port this page was served from.
ES384 · 9bed6853 is the signing algorithm and the short key id that appears in every token it signs.
On the right, LIVE means the browser is attached to the node's
event stream and new frames will appear on their own. It turns into
OFFLINE when the connection drops.
Navigation rail
View
What it is for
Compose
Build a request from a schema and send it.
Inbox
Frames that arrived here. The red badge counts unread ones.
Sent
Frames this node sent, with their transport result.
Peers
Known nodes, their addresses and public keys.
Identity
This node's own key, fingerprint and file paths.
Log
Everything, sent and received, as dense lines.
The foot of the rail shows how many frames the node currently holds. Short confirmations
(sent to localhost:8444, peer saved, loaded ping_request/example)
appear briefly as a blue toast in the bottom-right corner.
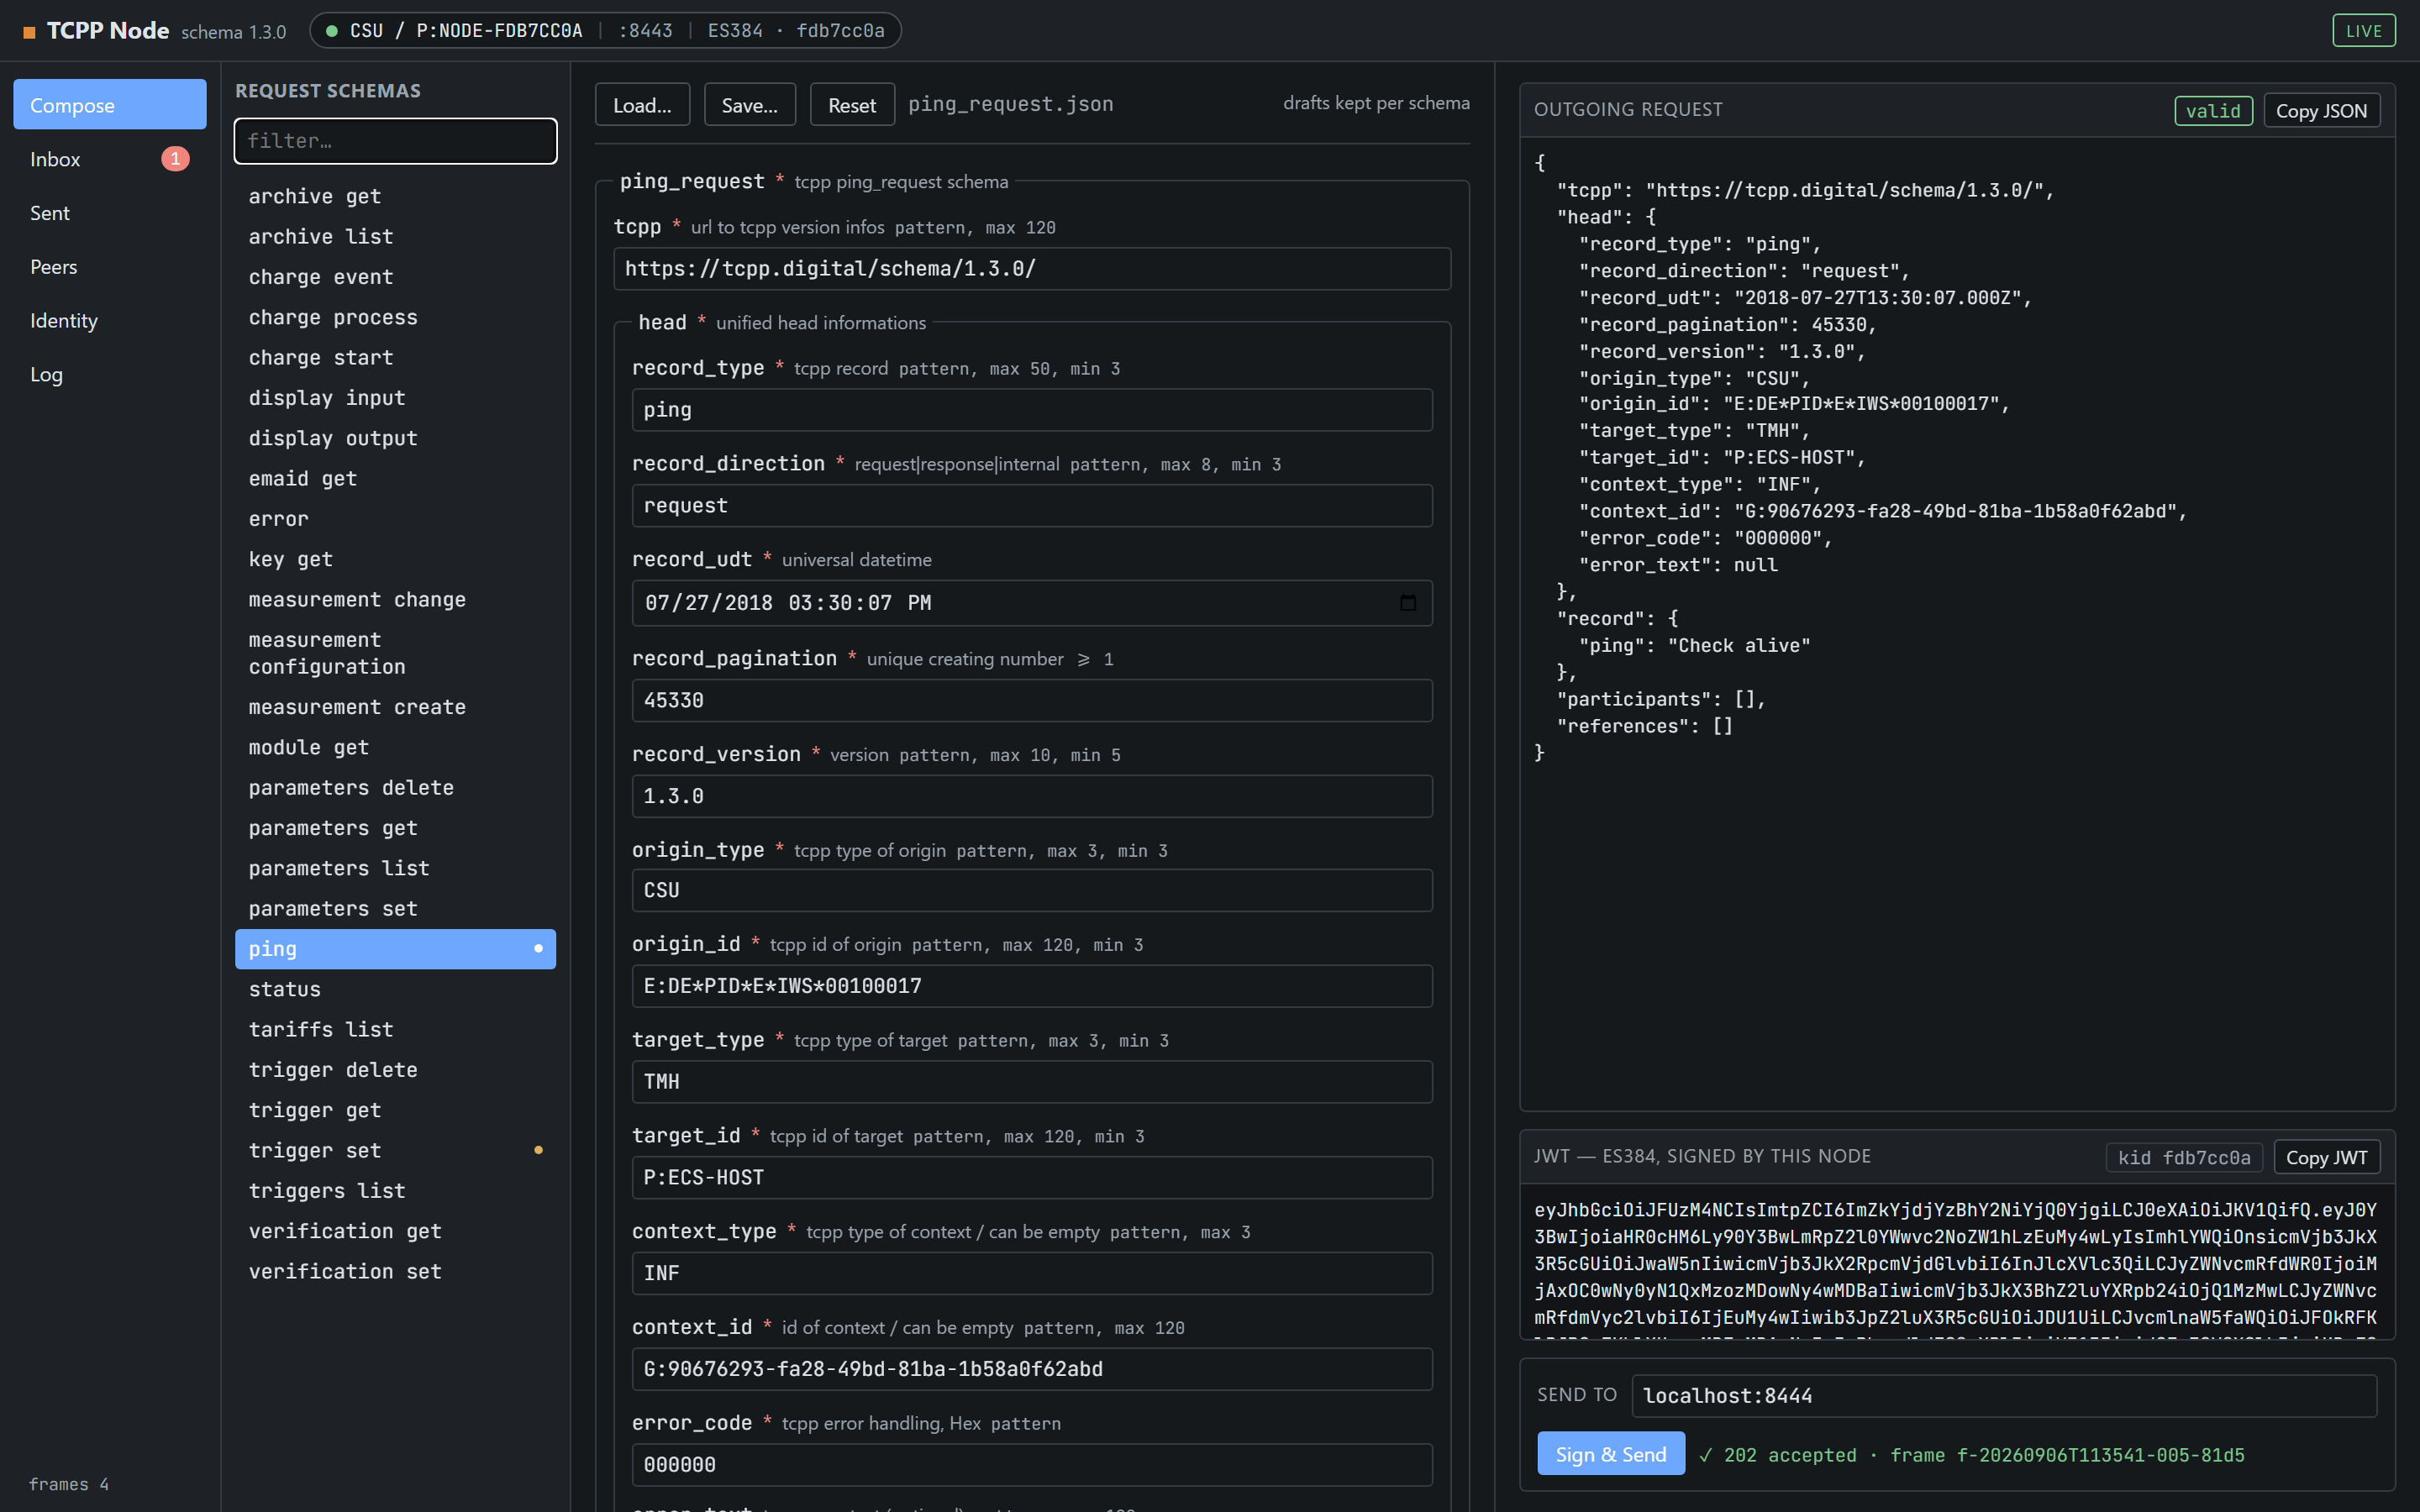
Light and dark
The application follows your operating system's colour scheme. Nothing else changes.
The same screen with the system set to dark.
Compose
Compose is three columns: the request schemas on the left, a form
generated from the selected schema in the middle, and what will actually go out on the
right.
Choosing a schema
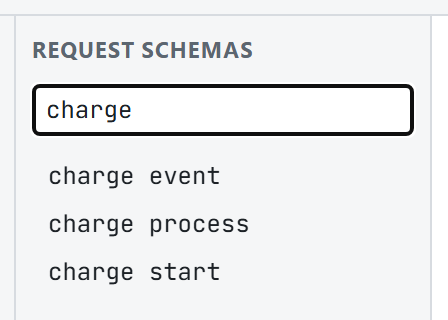
The left column lists all 27 request types. Type in filter… to
narrow it down; the filter matches the schema name, so charge leaves the
three charge endpoints.
The schema list, filtered. A small amber dot marks a schema you have an unsent draft
for; the selected schema is highlighted.
The generated form
The middle column is built from the JSON schema, not hand-written, so it always matches
what the node will accept. Each field shows its name in monospace, a red
* when it is required, the schema's description,
and a compact summary of its constraints (pattern, max 120,
min 3, >= 1).
Schema says
You get
enum
a dropdown, with a (none) entry when the field may be omitted or null
format: date
a date picker
format: date-time
a date-and-time picker, read back as an ISO timestamp
string, long maxLength
a text area
string
a text box; hover it to see the pattern it must match
number, integer
a number box carrying minimum and multipleOf
boolean
a checkbox
object
a bordered group; a nullable one gets a set to null switch that hides its body
array
numbered item cards with Remove, and a + Add … button underneath
object without properties
a raw JSON text area, validated as you type
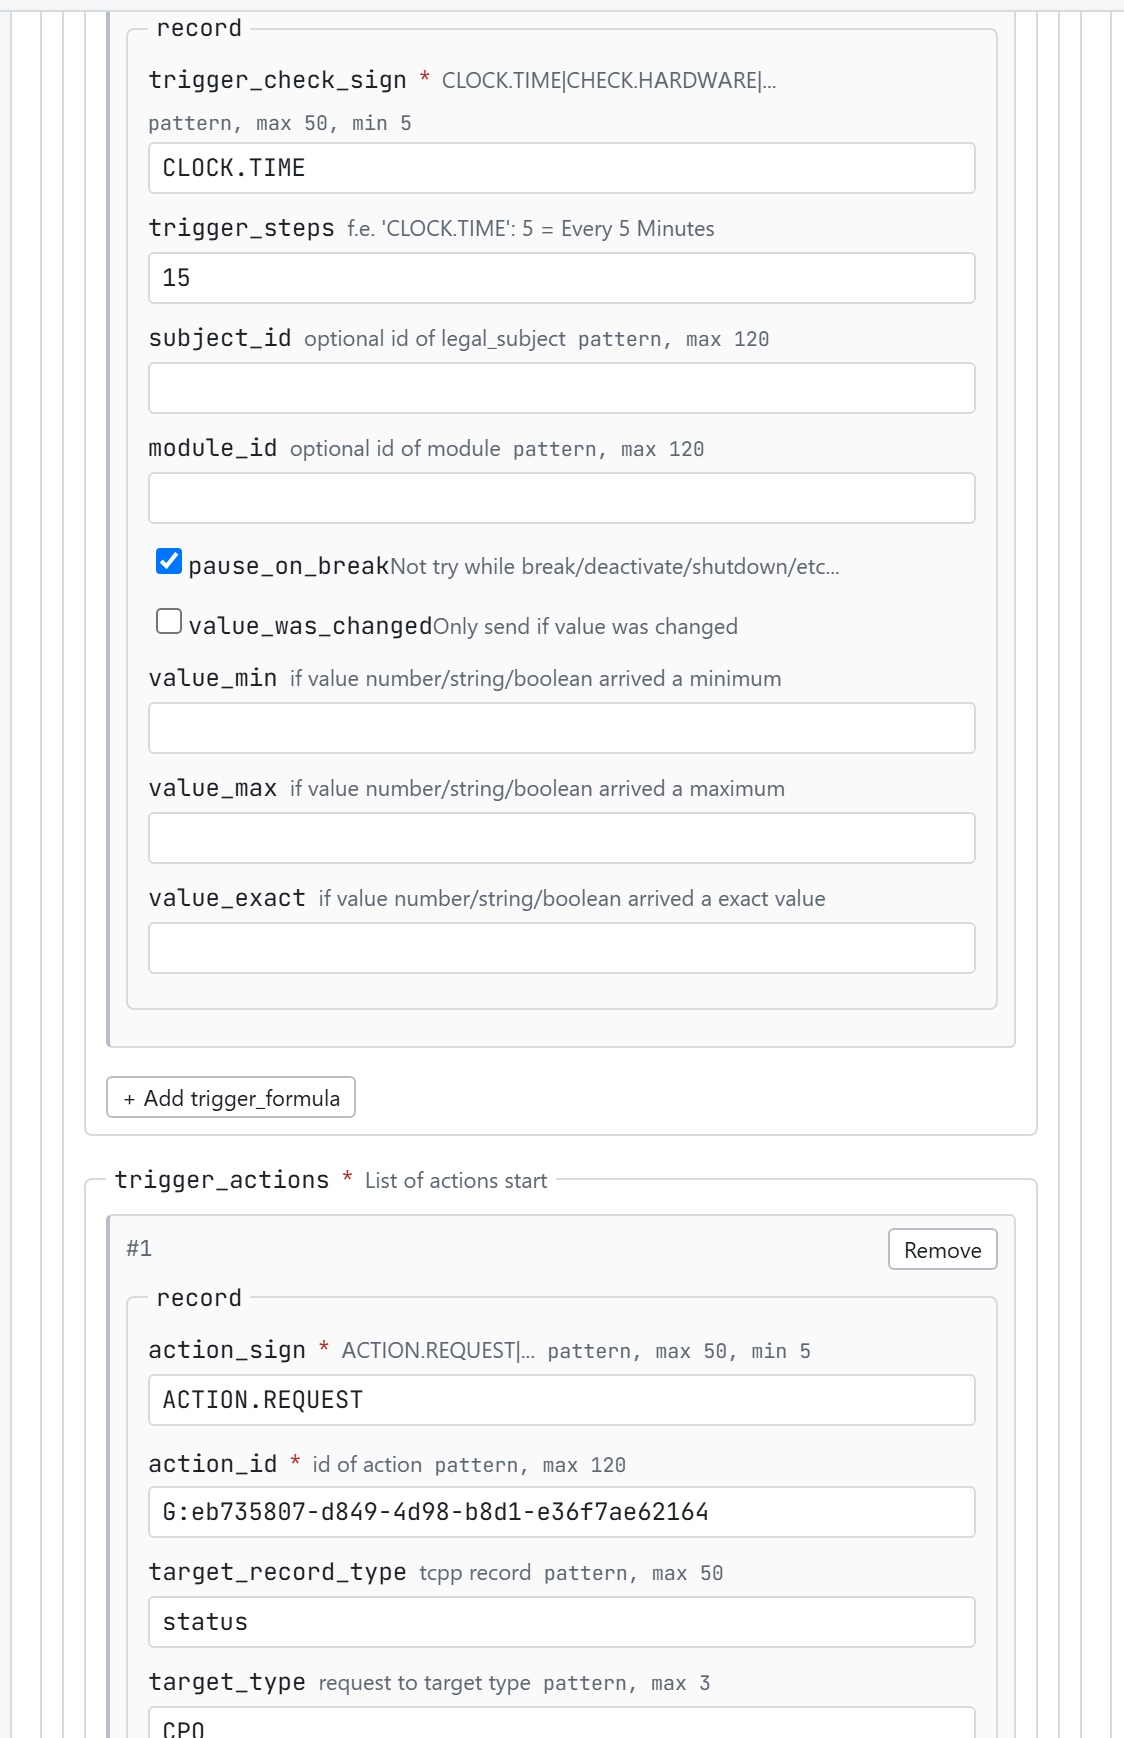
trigger_set scrolled down to record: checkboxes, a numbered
array item with Remove, and + Add trigger_formula
to append another.
What goes out
The right column mirrors the form as you type. Outgoing request is the
exact JSON that will be signed, and the badge beside it says valid
or how many issues the schema found. The JWT panel is empty until you
send: the node signs, so the private key never enters the browser. After a send it holds
the compact token, and Copy JSON / Copy JWT
put either on the clipboard.
Send to takes a host:port. It starts out holding the node's
default target (--peer) and offers your known peers as suggestions; a bare
host or IP gets this node's own port appended. Press
Sign & Send and the status line beside it reports the outcome.
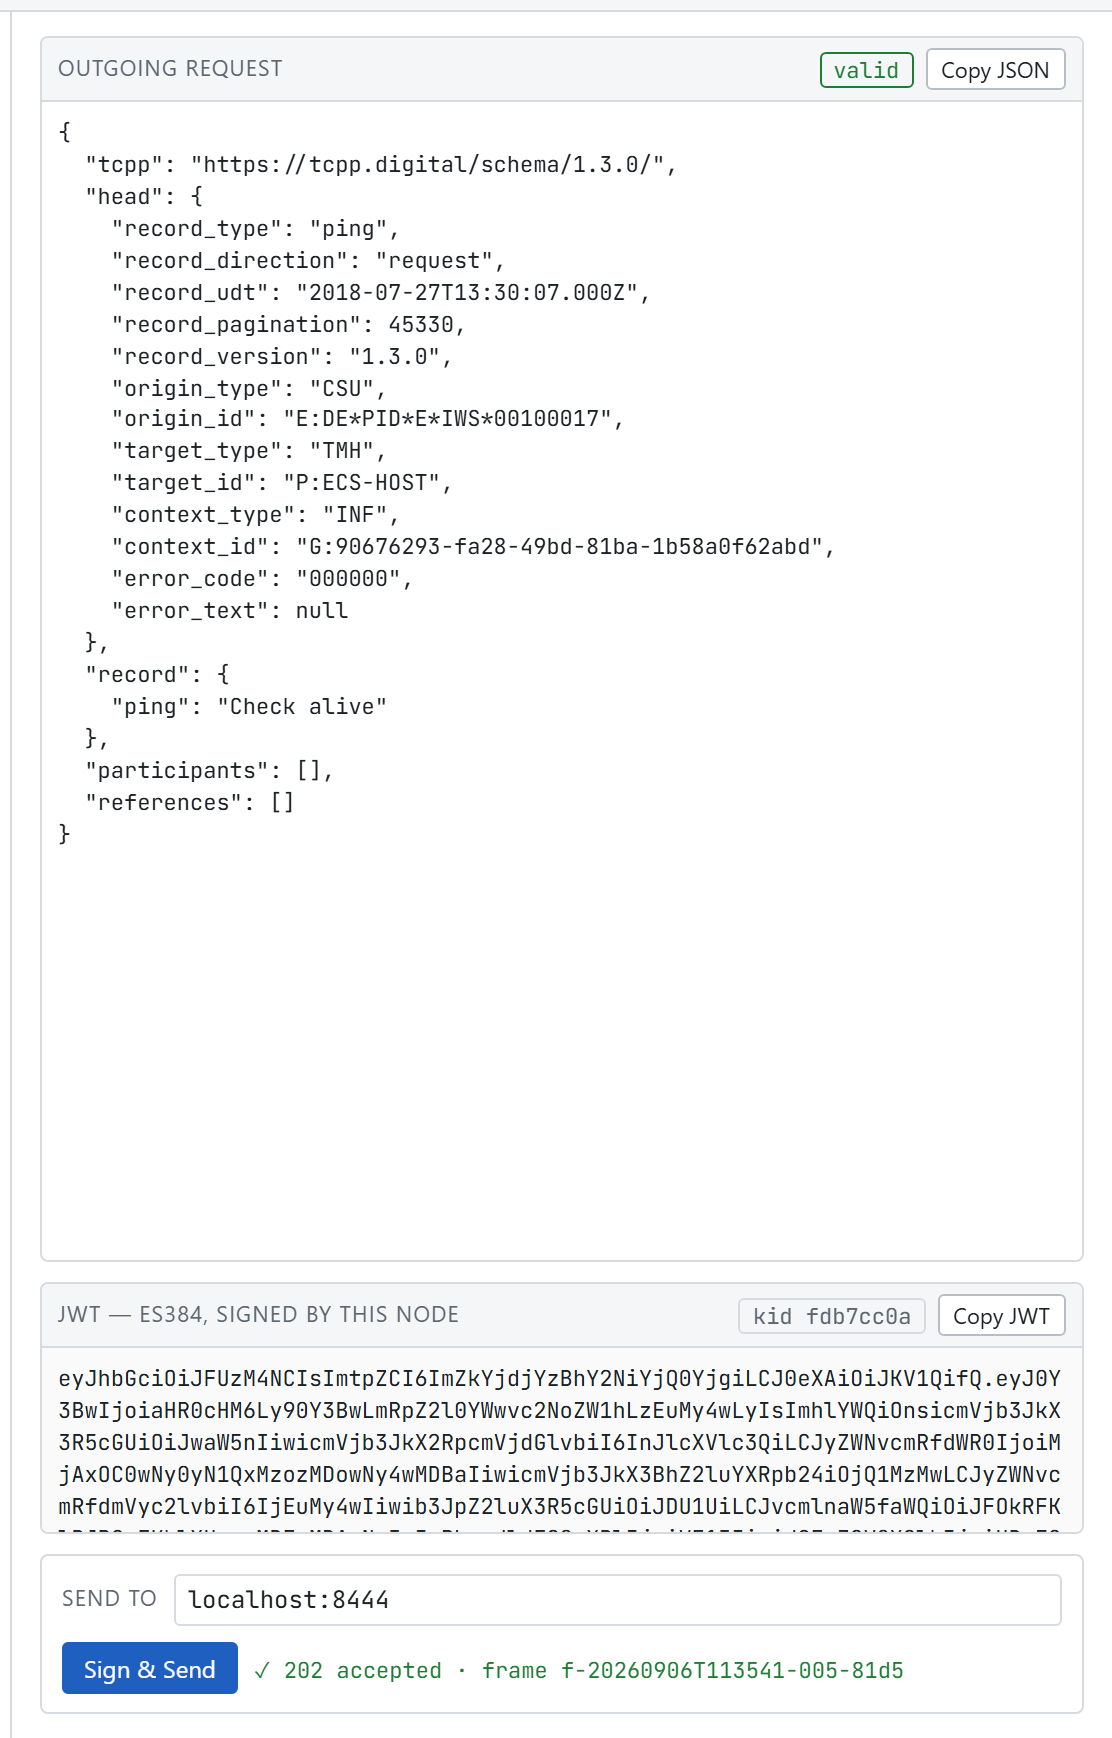
After a successful send: the token that was signed, and
✓ 202 accepted · frame f-… naming the frame you can now find
under Sent.
Drafts
Each schema keeps its own draft while the tab is open, so you can jump to another
schema and come back to what you were typing. Reset throws the
draft away and rebuilds the form empty. Drafts do not survive a page reload; to keep
something, save it as a record.
The record library
A record is a stored payload on the node, at
records/<schema>/<name>.json. On first start the node writes
every example shipped in the binary into that directory, and from then on the library is
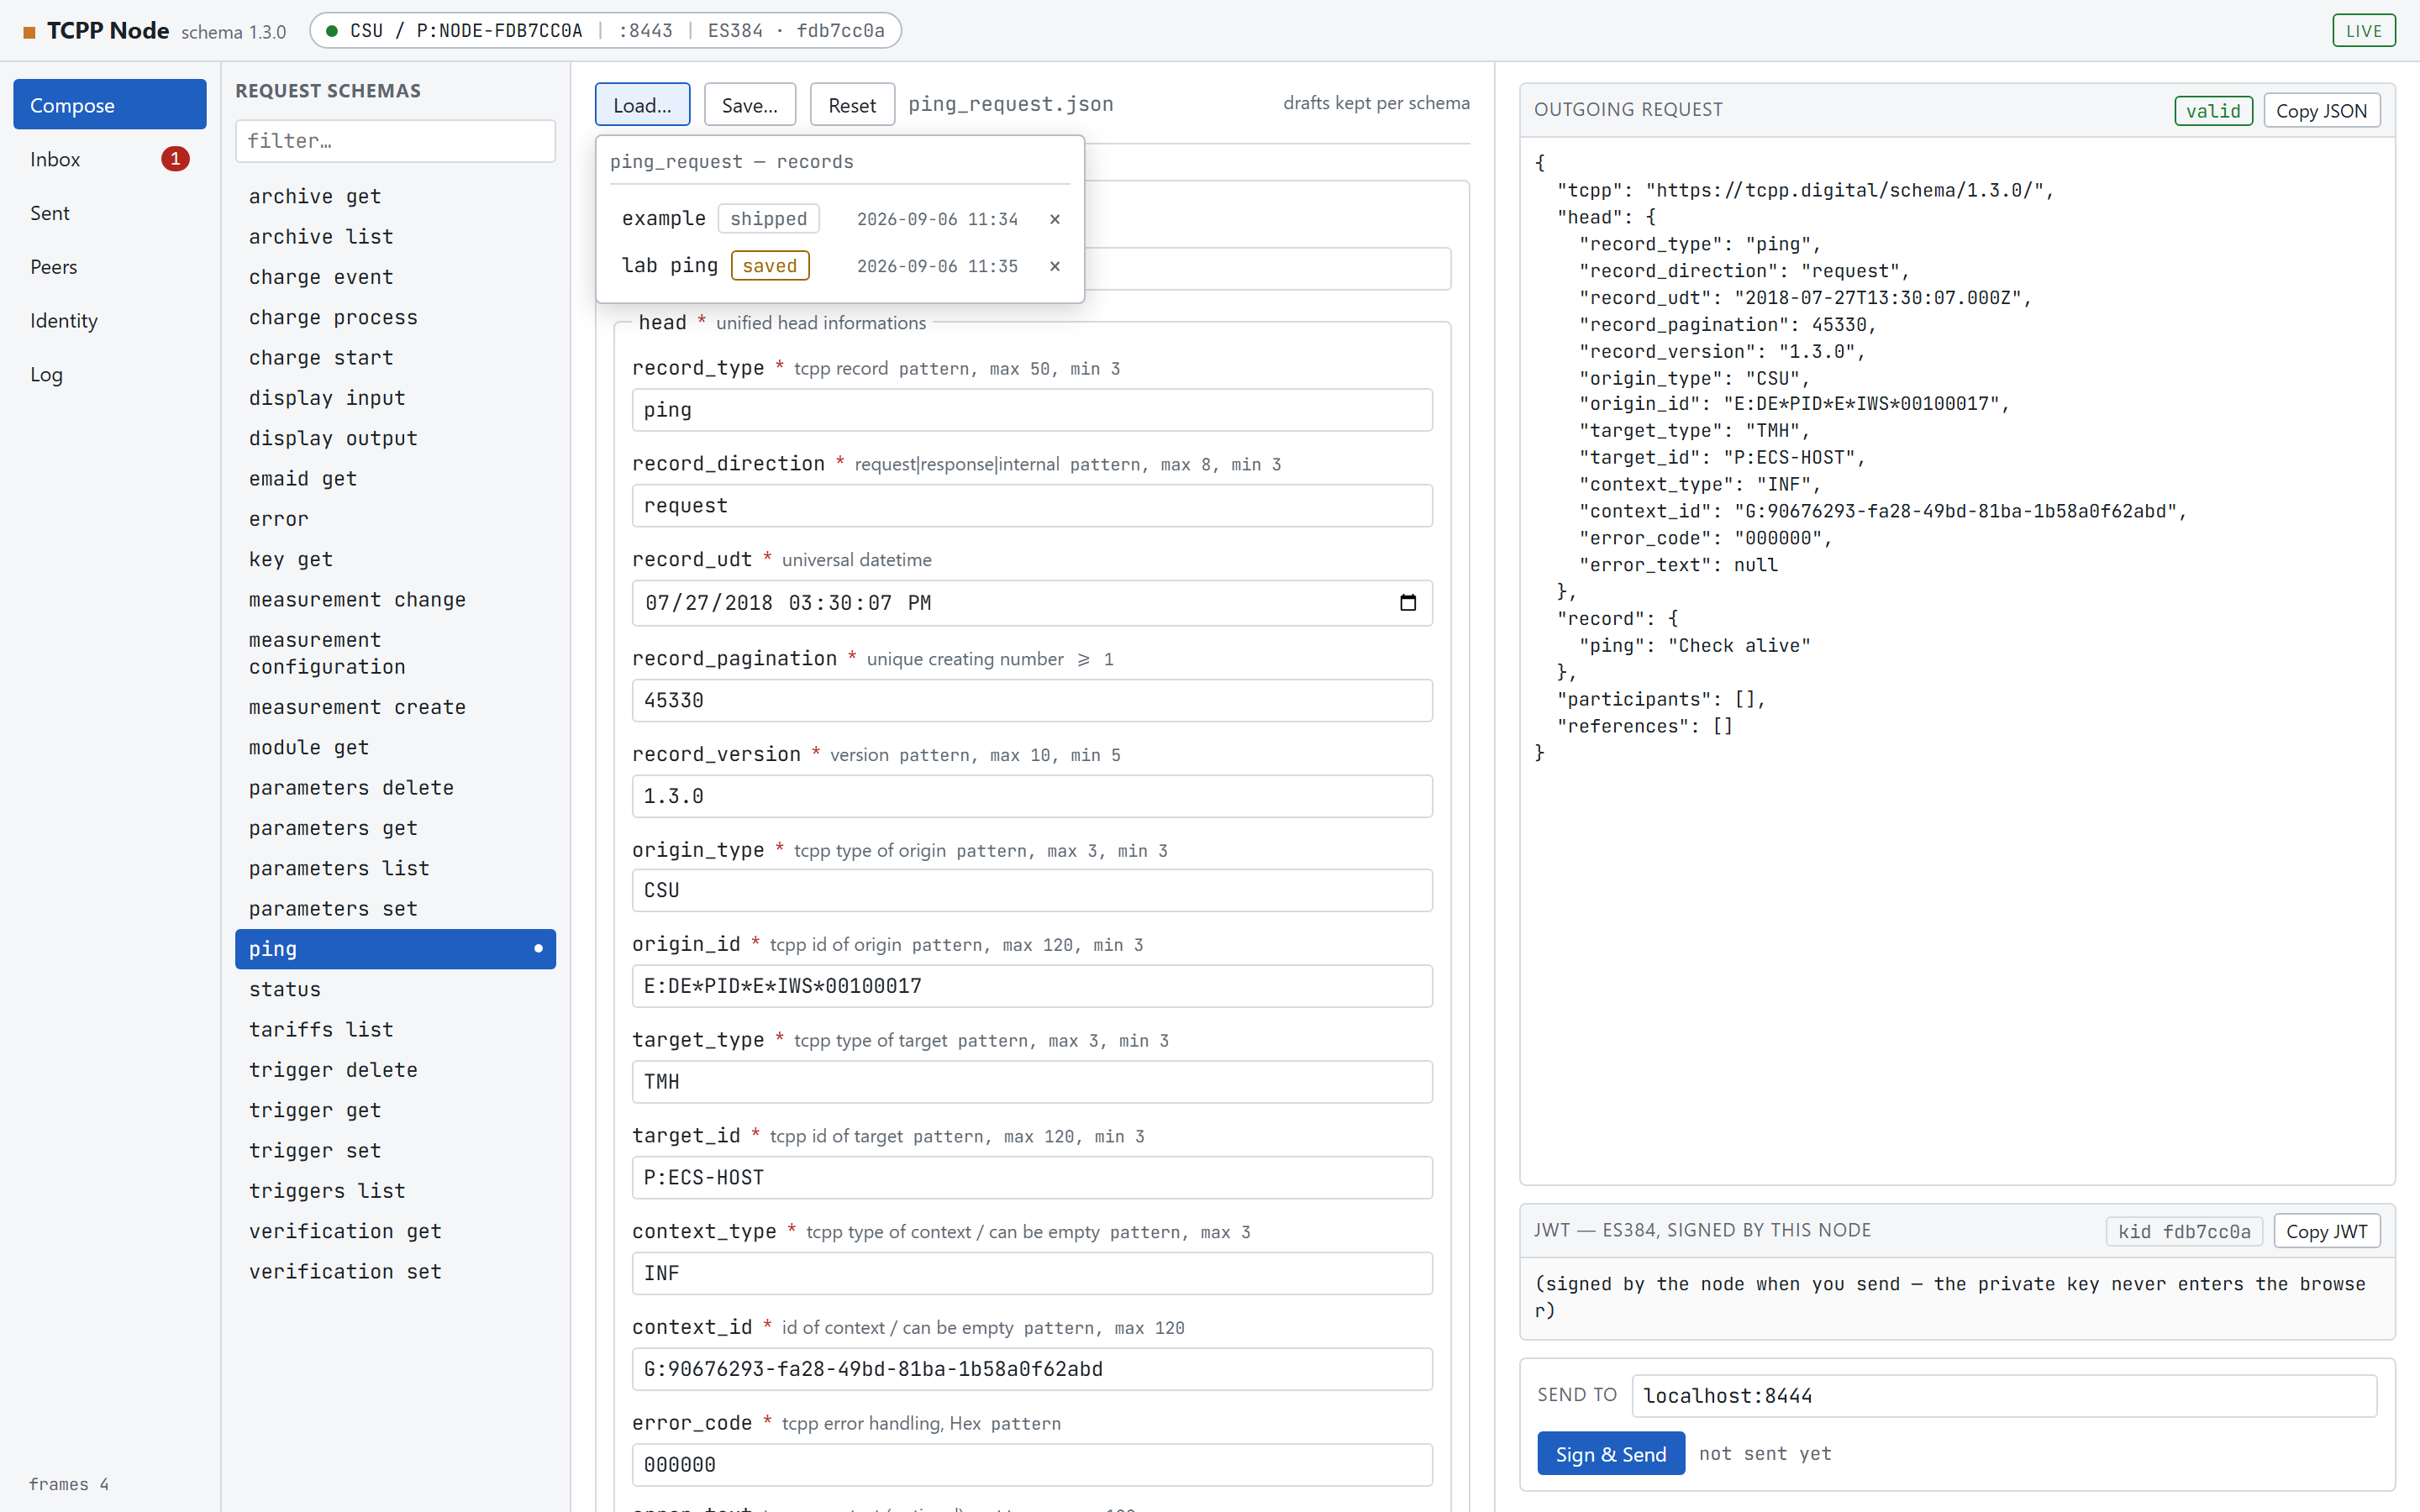
yours to grow. Load… and Save… sit in the
toolbar of both the compose form and the reply form.
Load… lists the records stored for this schema. A
shipped record came with the binary, a
saved one is yours. × deletes one, after a
confirmation.
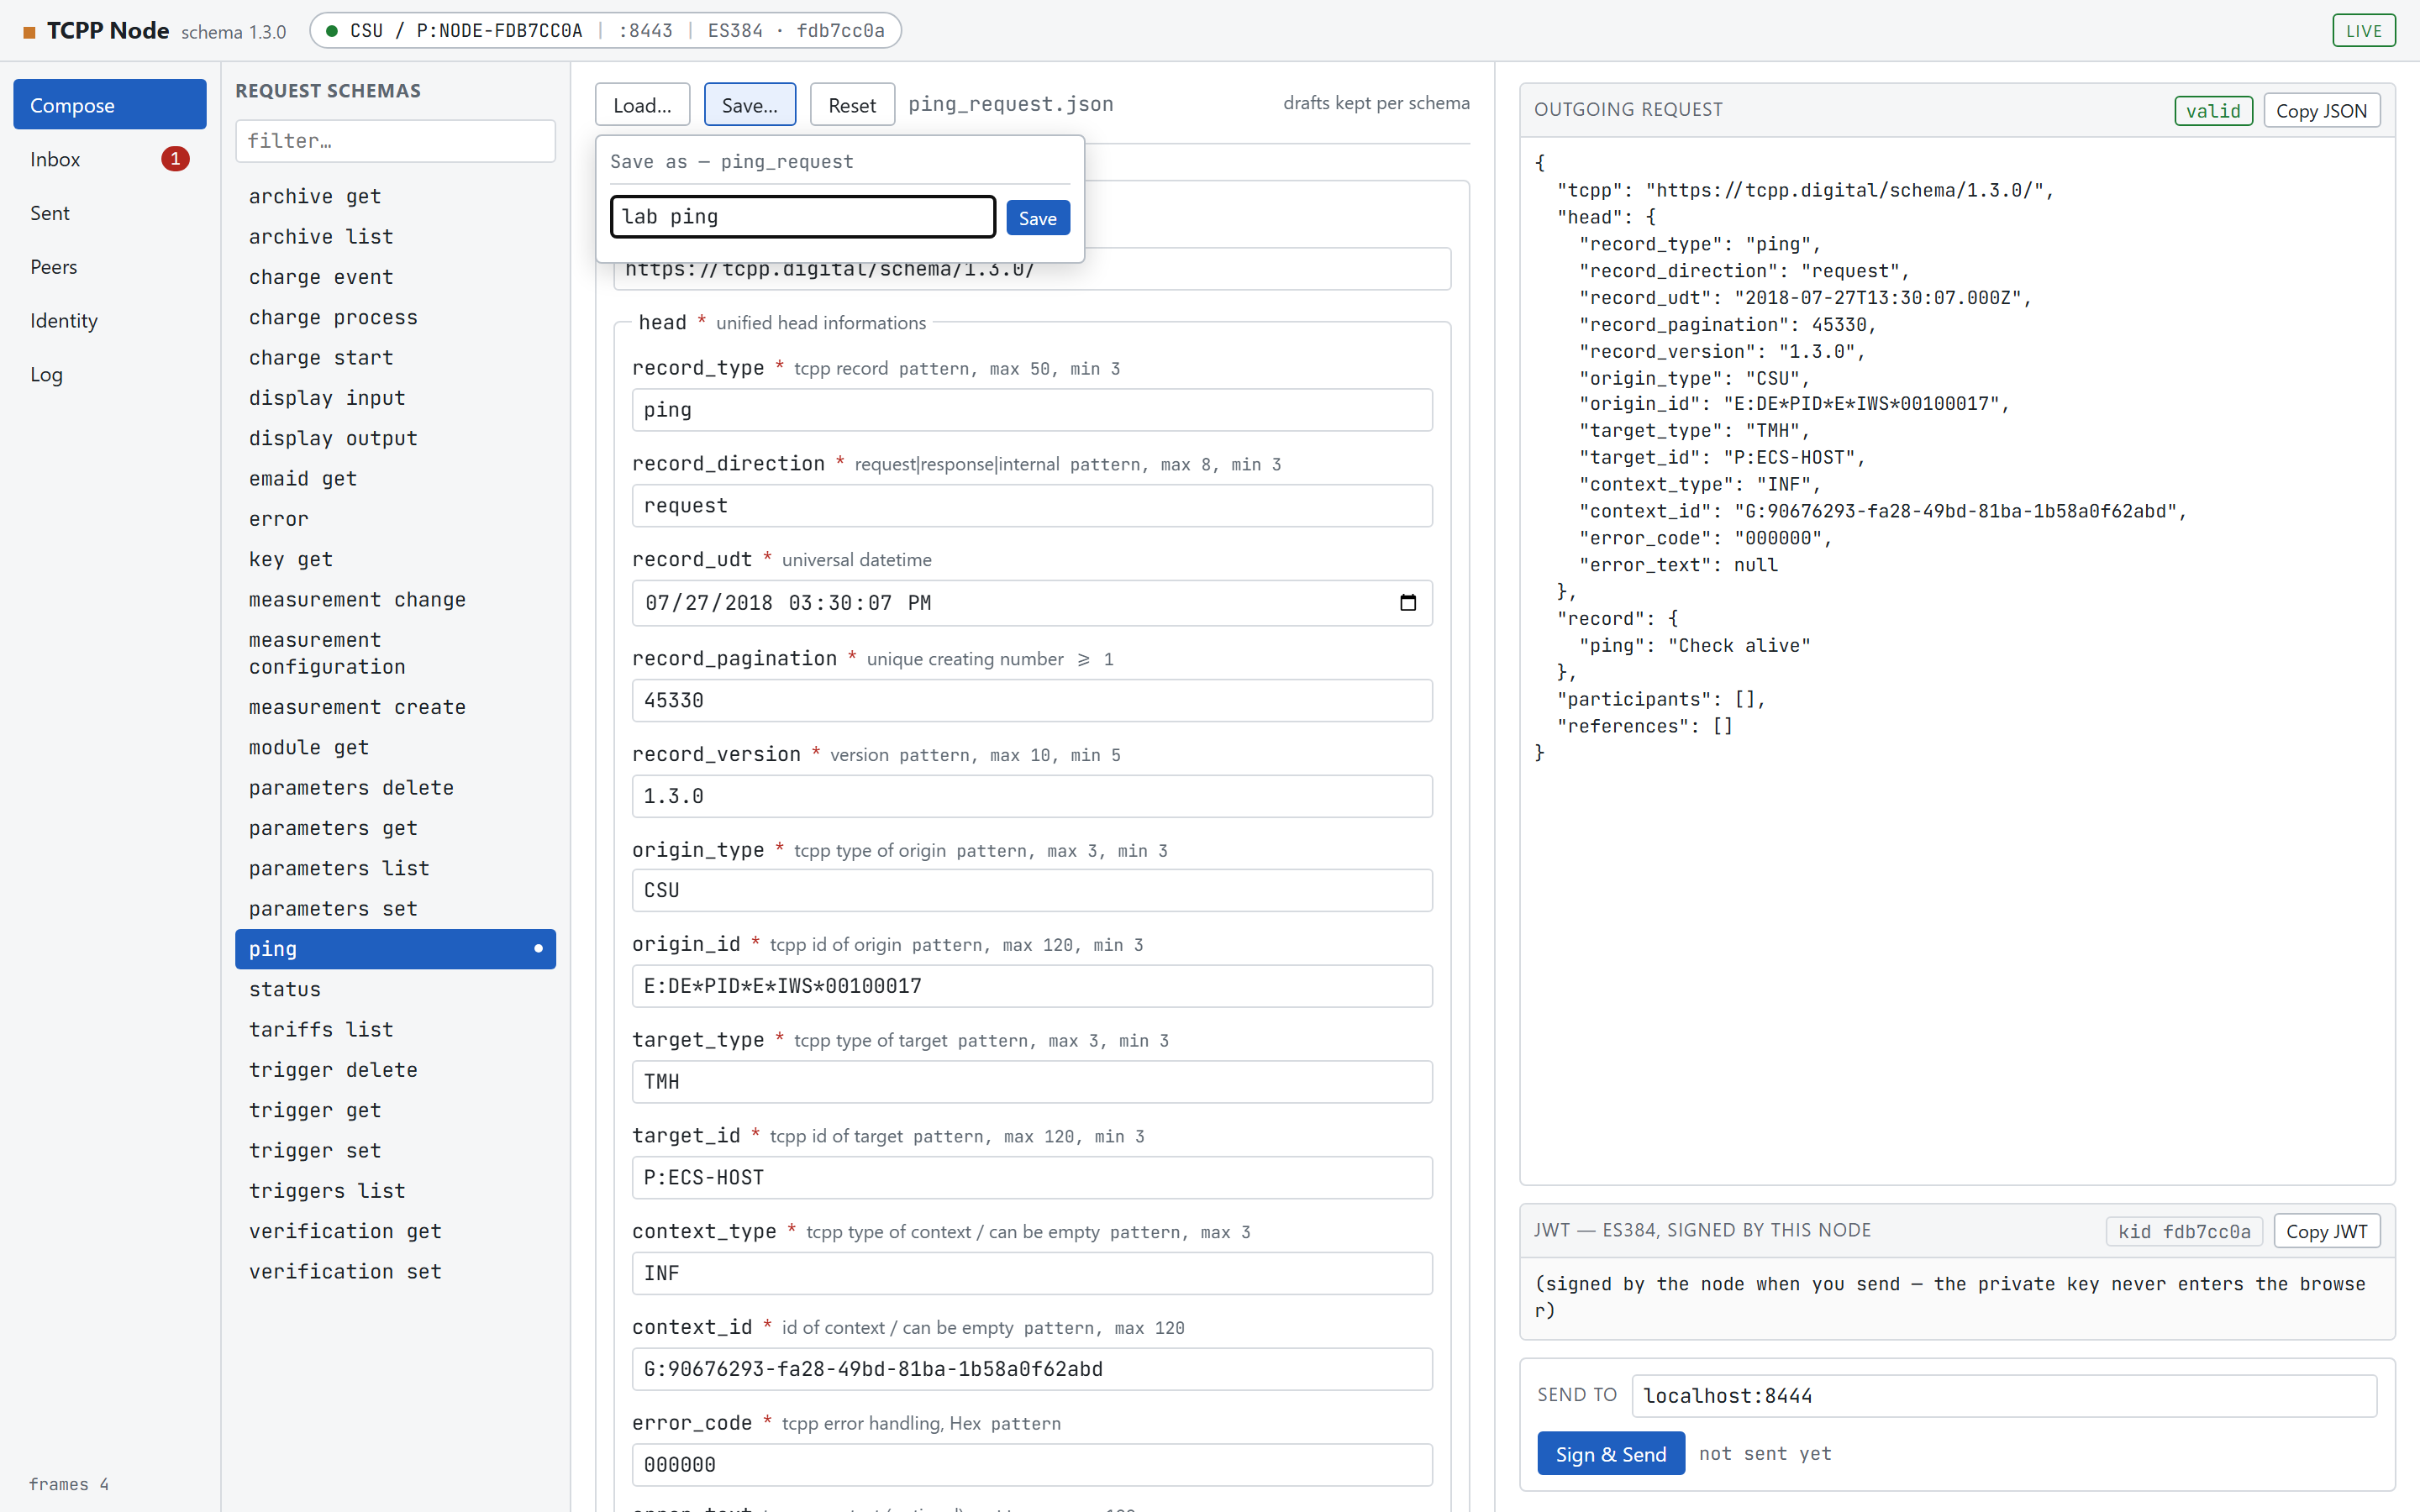
Save… asks for a name. It offers the name you last loaded, warns
when you are about to overwrite, and refuses names outside
letters, digits, space, dot, underscore, dash.
Loading a record replaces the form contents; saving stores what the form currently holds.
The bytes are kept exactly as they were, key order included, because
those bytes are what gets signed the next time the record is loaded and sent.
Restoring the shipped examples
Seeding happens per schema directory: one that already exists is left alone, so a record
you delete stays deleted. Delete records/<schema>/, or all of
records/, and the shipped examples come back on the next start. The
embedded examples are read-only and always available at
/api/example/…, so editing a record can never damage them.
Validation
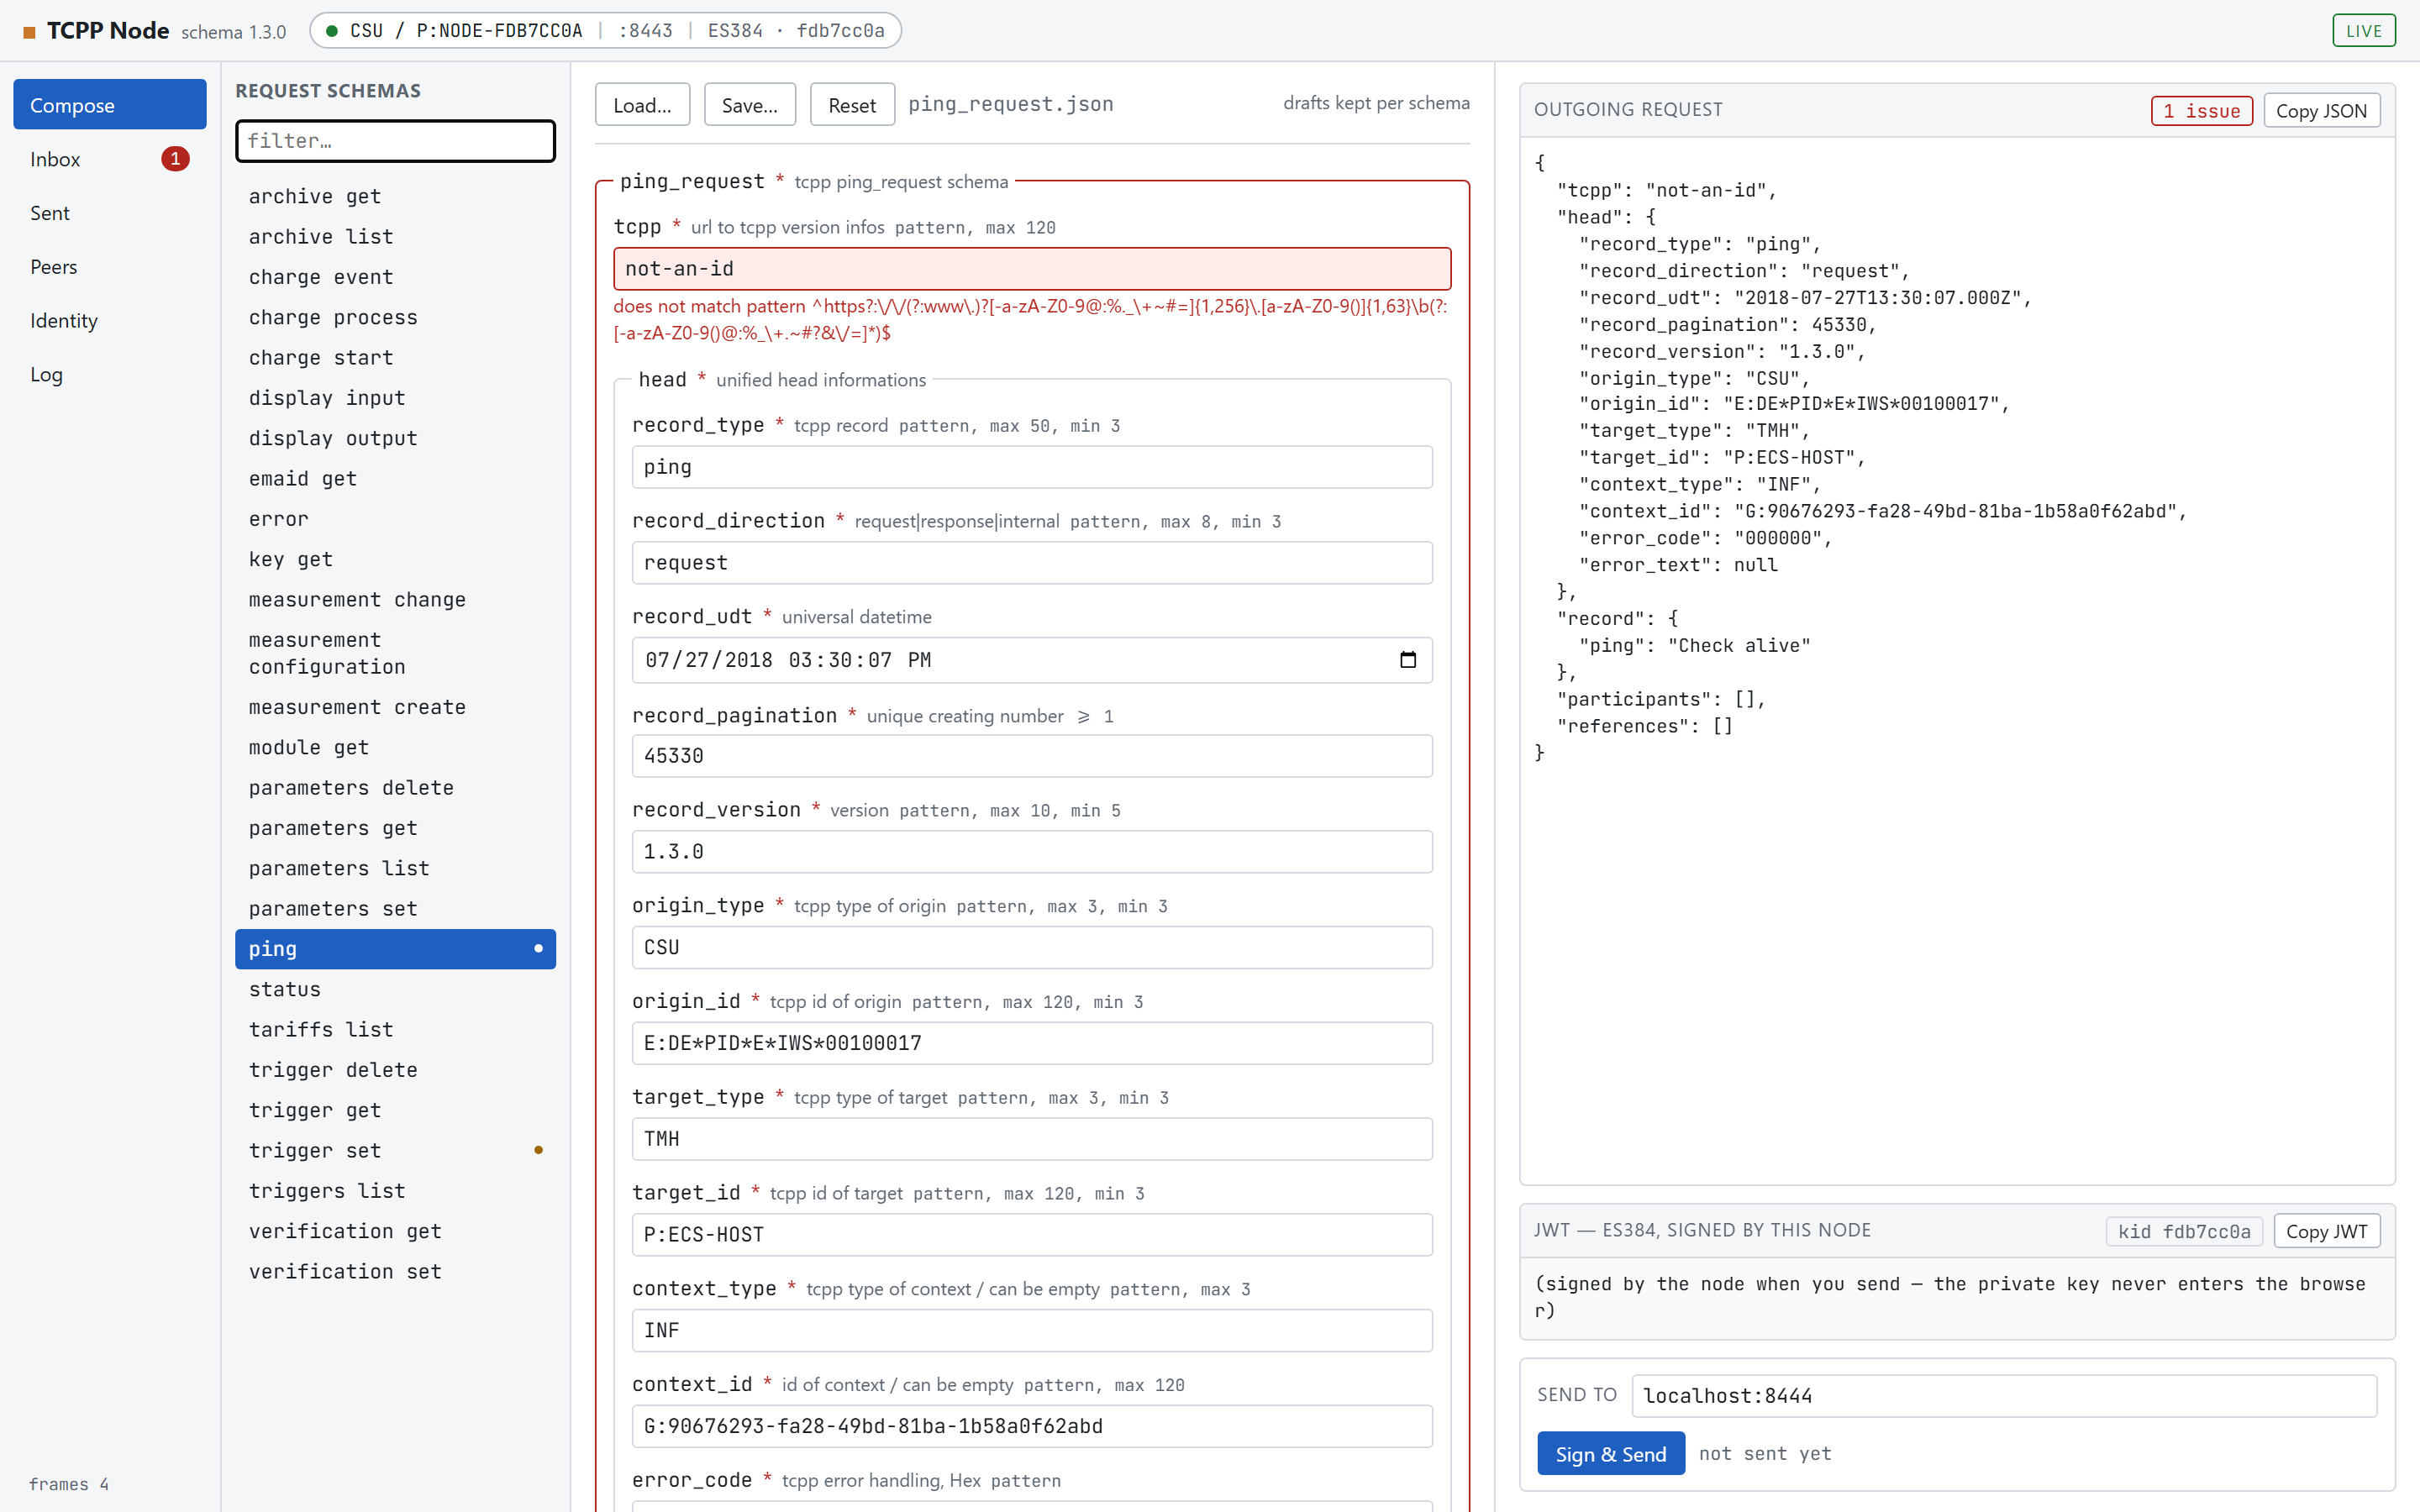
The form is checked against the schema as you type. A field that fails gets a red border
and the reason underneath it, every group containing a bad field is outlined, and the
badge above the JSON pane counts what is left. Click the badge to jump to the first
offending field.
One field fails its pattern. The message under the box is the actual rule from the
schema, and the badge reads 1 issue.
The field you are currently typing in is never marked; the marks are applied when you
leave it, so the form does not flash red while you work.
Issues never block a send
Sign & Send stays enabled no matter how many issues there
are. Sending a deliberately malformed record is a legitimate way to test what a peer
does with one, and the peer, not the sender, is the authority on what it accepts.
Checked keywords are type, required, properties,
items, minItems, minLength/maxLength,
pattern, minimum/maximum, multipleOf,
enum, format: date, format: date-time and local
$ref. Anything else in the schema is ignored rather than guessed at.
Inbox and replying
Everything another node sends here lands in Inbox, including
frames that could not be parsed, which are recorded rather than dropped. New arrivals
appear without a reload and raise a toast.
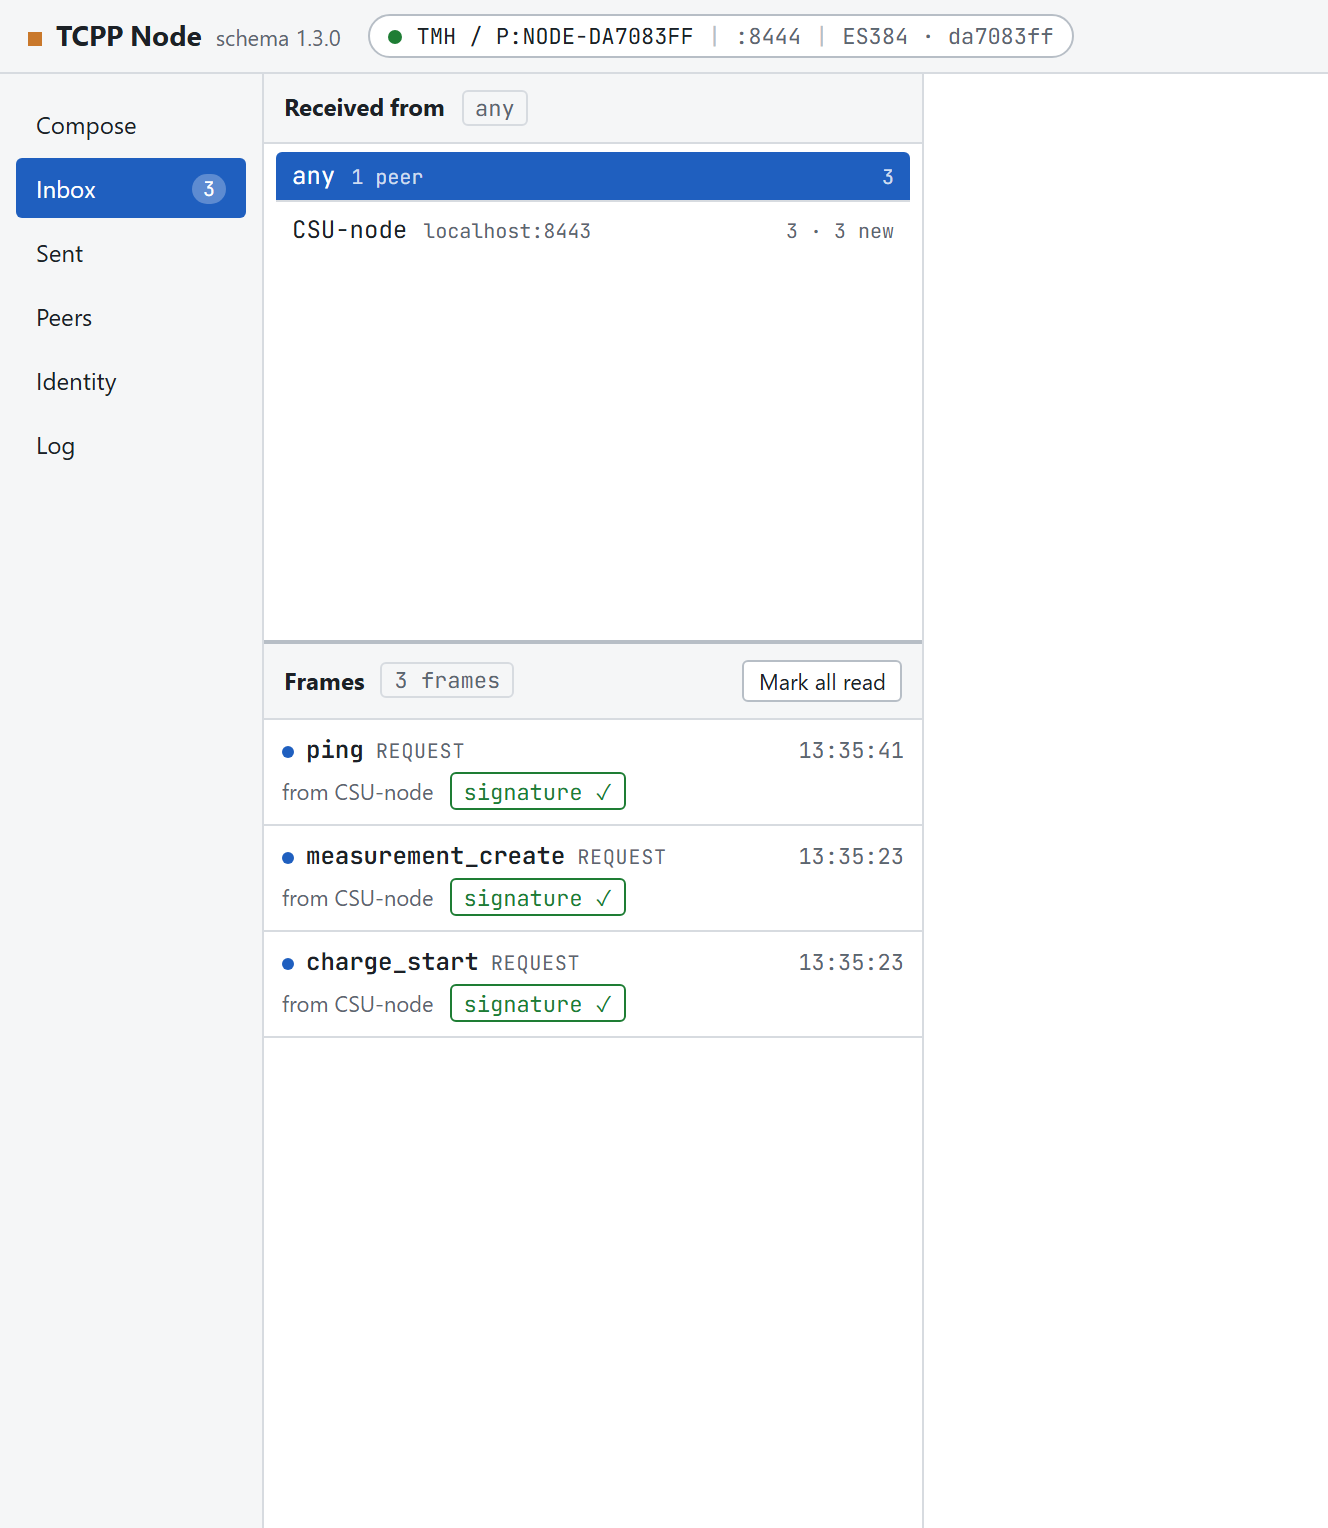
The left column of the inbox. The upper pane filters by sender; the lower one lists
frames, newest first, with Mark all read on the right.
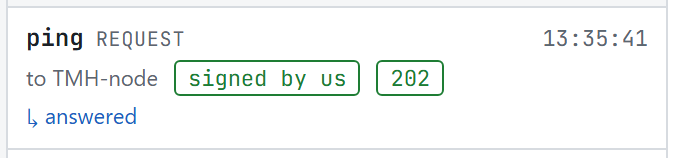
Reading a frame line
One entry. Top: the record type, its direction and the time. Middle: the peer and the state badges. Bottom: how it relates to another frame.
The third line appears only when the frame is part of a pair:
↳ answered: a request of yours that has since been answered.
↳ awaiting response: a request that has not been answered yet.
↳ answers an earlier request: this frame is the answer to one.
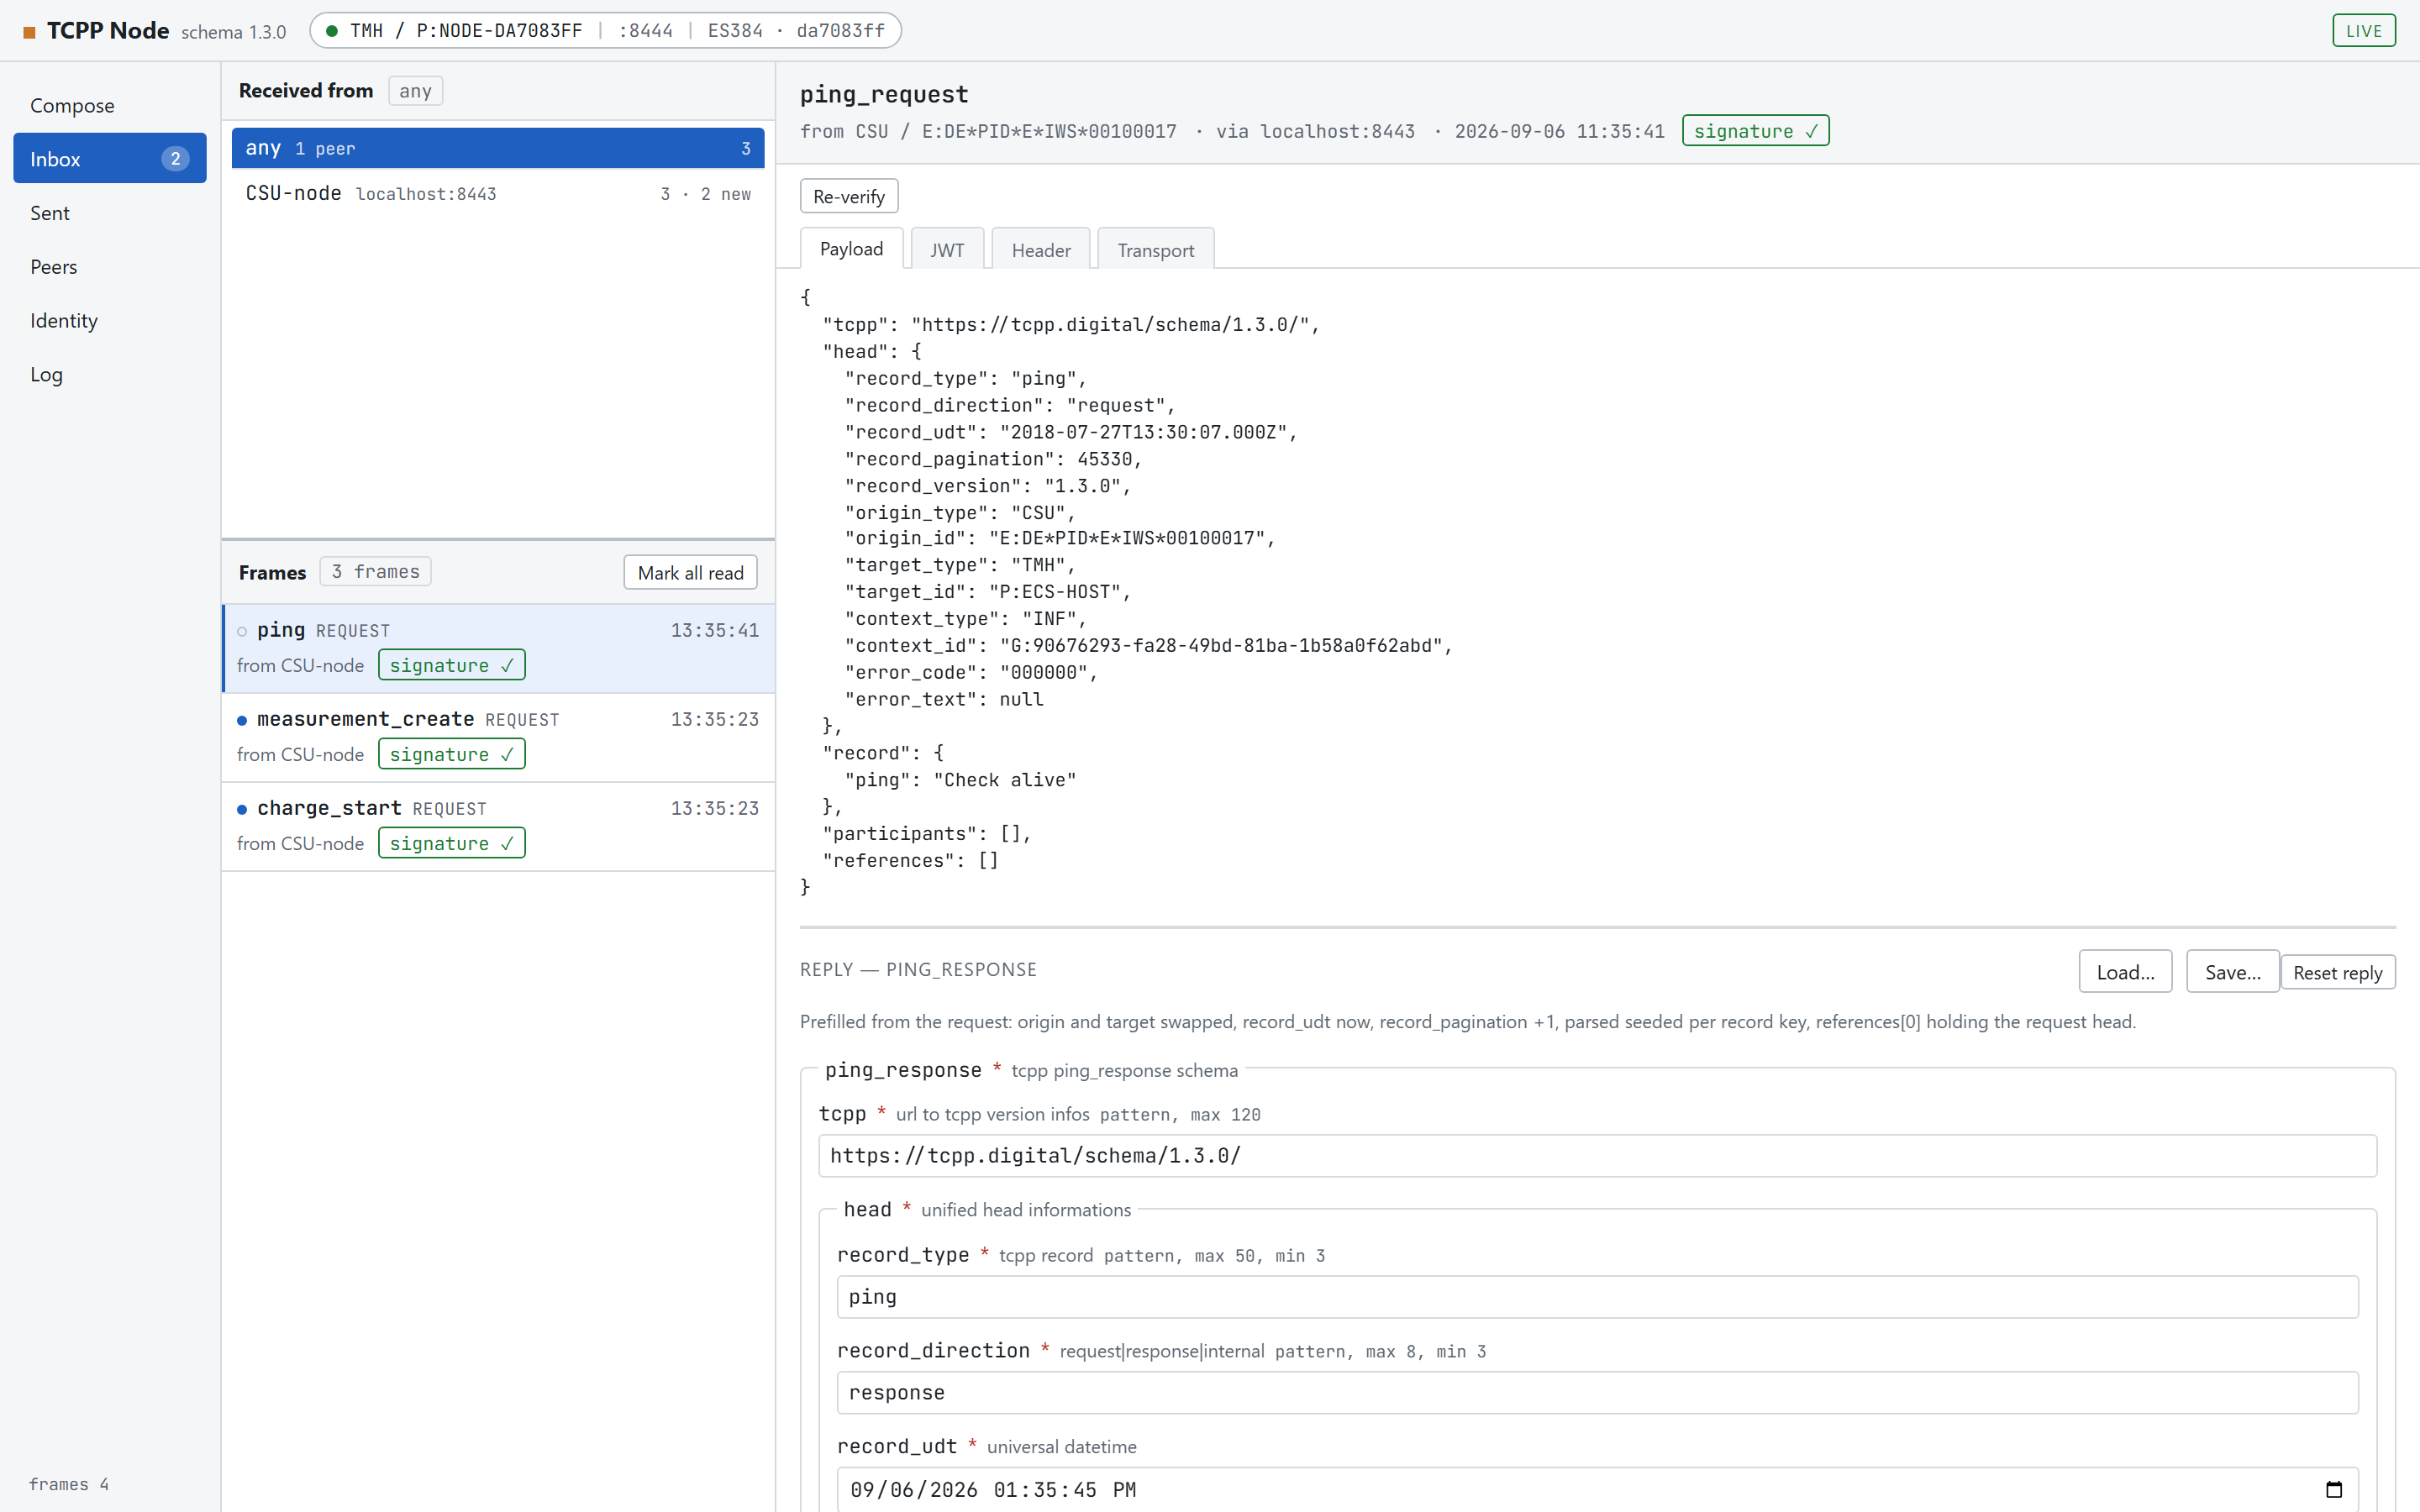
Frame detail
Selecting a frame opens it on the right and marks it read.
A received request. The line under the title names who sent it, over which address it
arrived, when, and how its signature checked out.
Four tabs hold everything the node kept:
Tab
Shows
Payload
the decoded TCPP message, formatted.
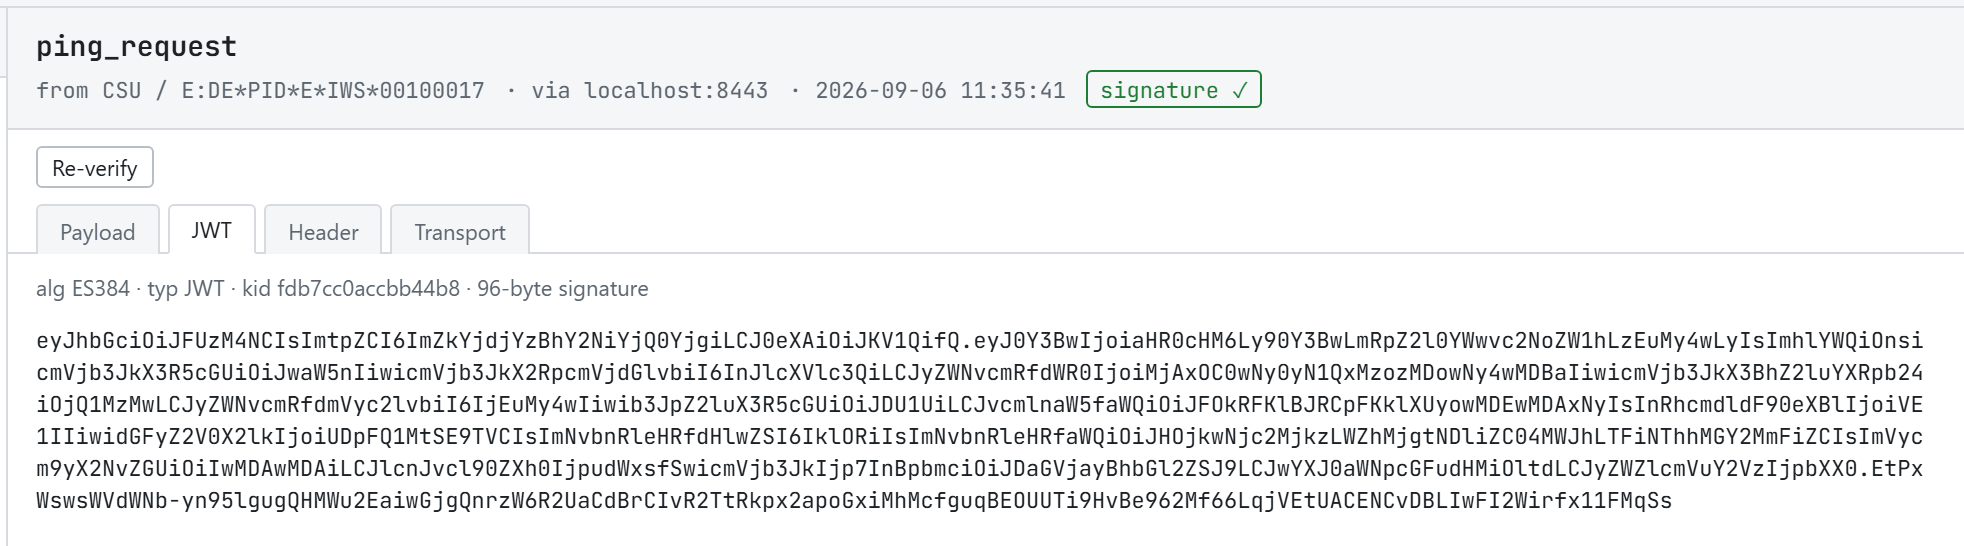
JWT
a one-line summary and the raw compact token as it arrived.
The JWT tab. The token is exactly the bytes that were verified; nothing was re-encoded on the way in.
Re-verify checks the stored signature again against whatever key
the peer has now, and reports the result in a toast. It is the button to press after
adding or changing a peer's key.
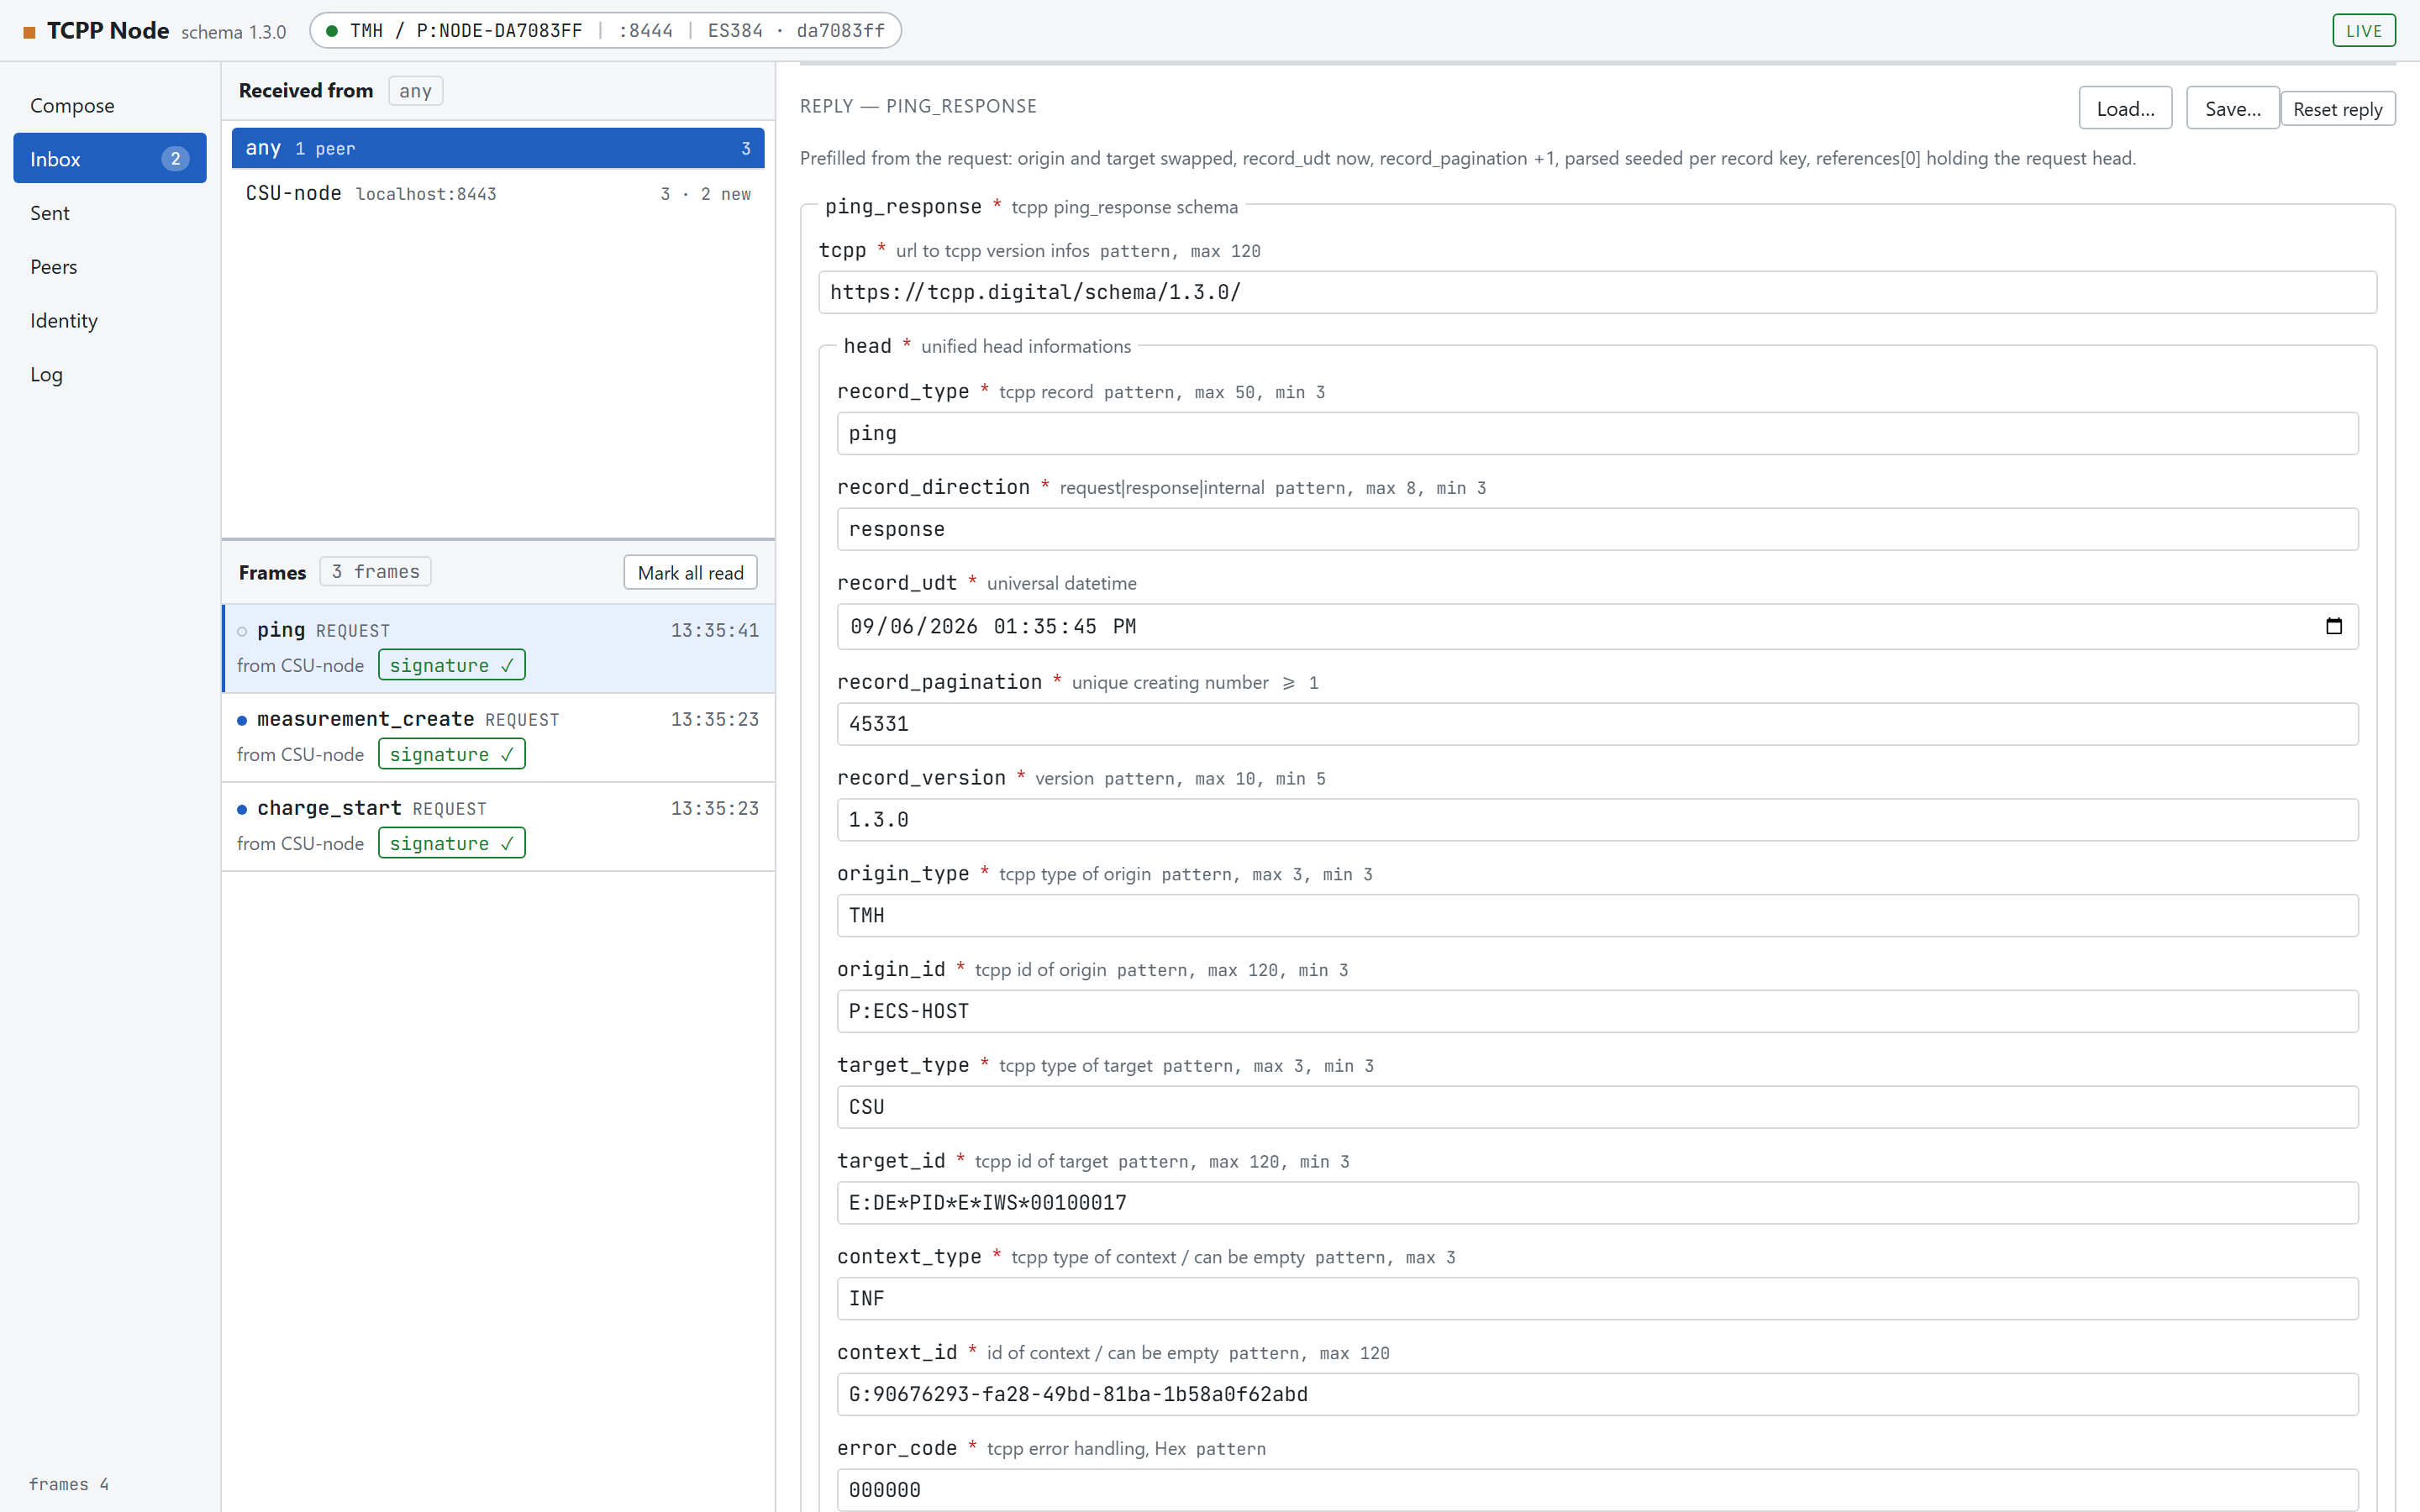
Replying
When the open frame is a request and the schema set has a matching response, a
reply form is appended below the tabs, already filled in from the request:
origin and target swapped, since you are answering the sender;
record_udt set to now and record_pagination raised by one;
error_code reset to 000000 rather than echoing the request's;
parsed seeded with an entry per record key;
references[0] holding the request's head, which is what lets both nodes pair the two frames.
The reply block. Note the swapped origin_type/target_type and
the raised record_pagination. Load… and
Save… here address the response schema.
The address to answer on is pre-filled and editable. If the sender advertised a return
address you are told so; if the node had to infer it from the connection, you are told to
check it. Sign & Send response signs and delivers it, and
Reset reply seeds the form from the request again.
A reply you have started is kept per frame while the tab is open, so moving to another
frame and back does not lose it. When the opened frame is itself a response,
there is no form, just a note pointing at the request it answers.
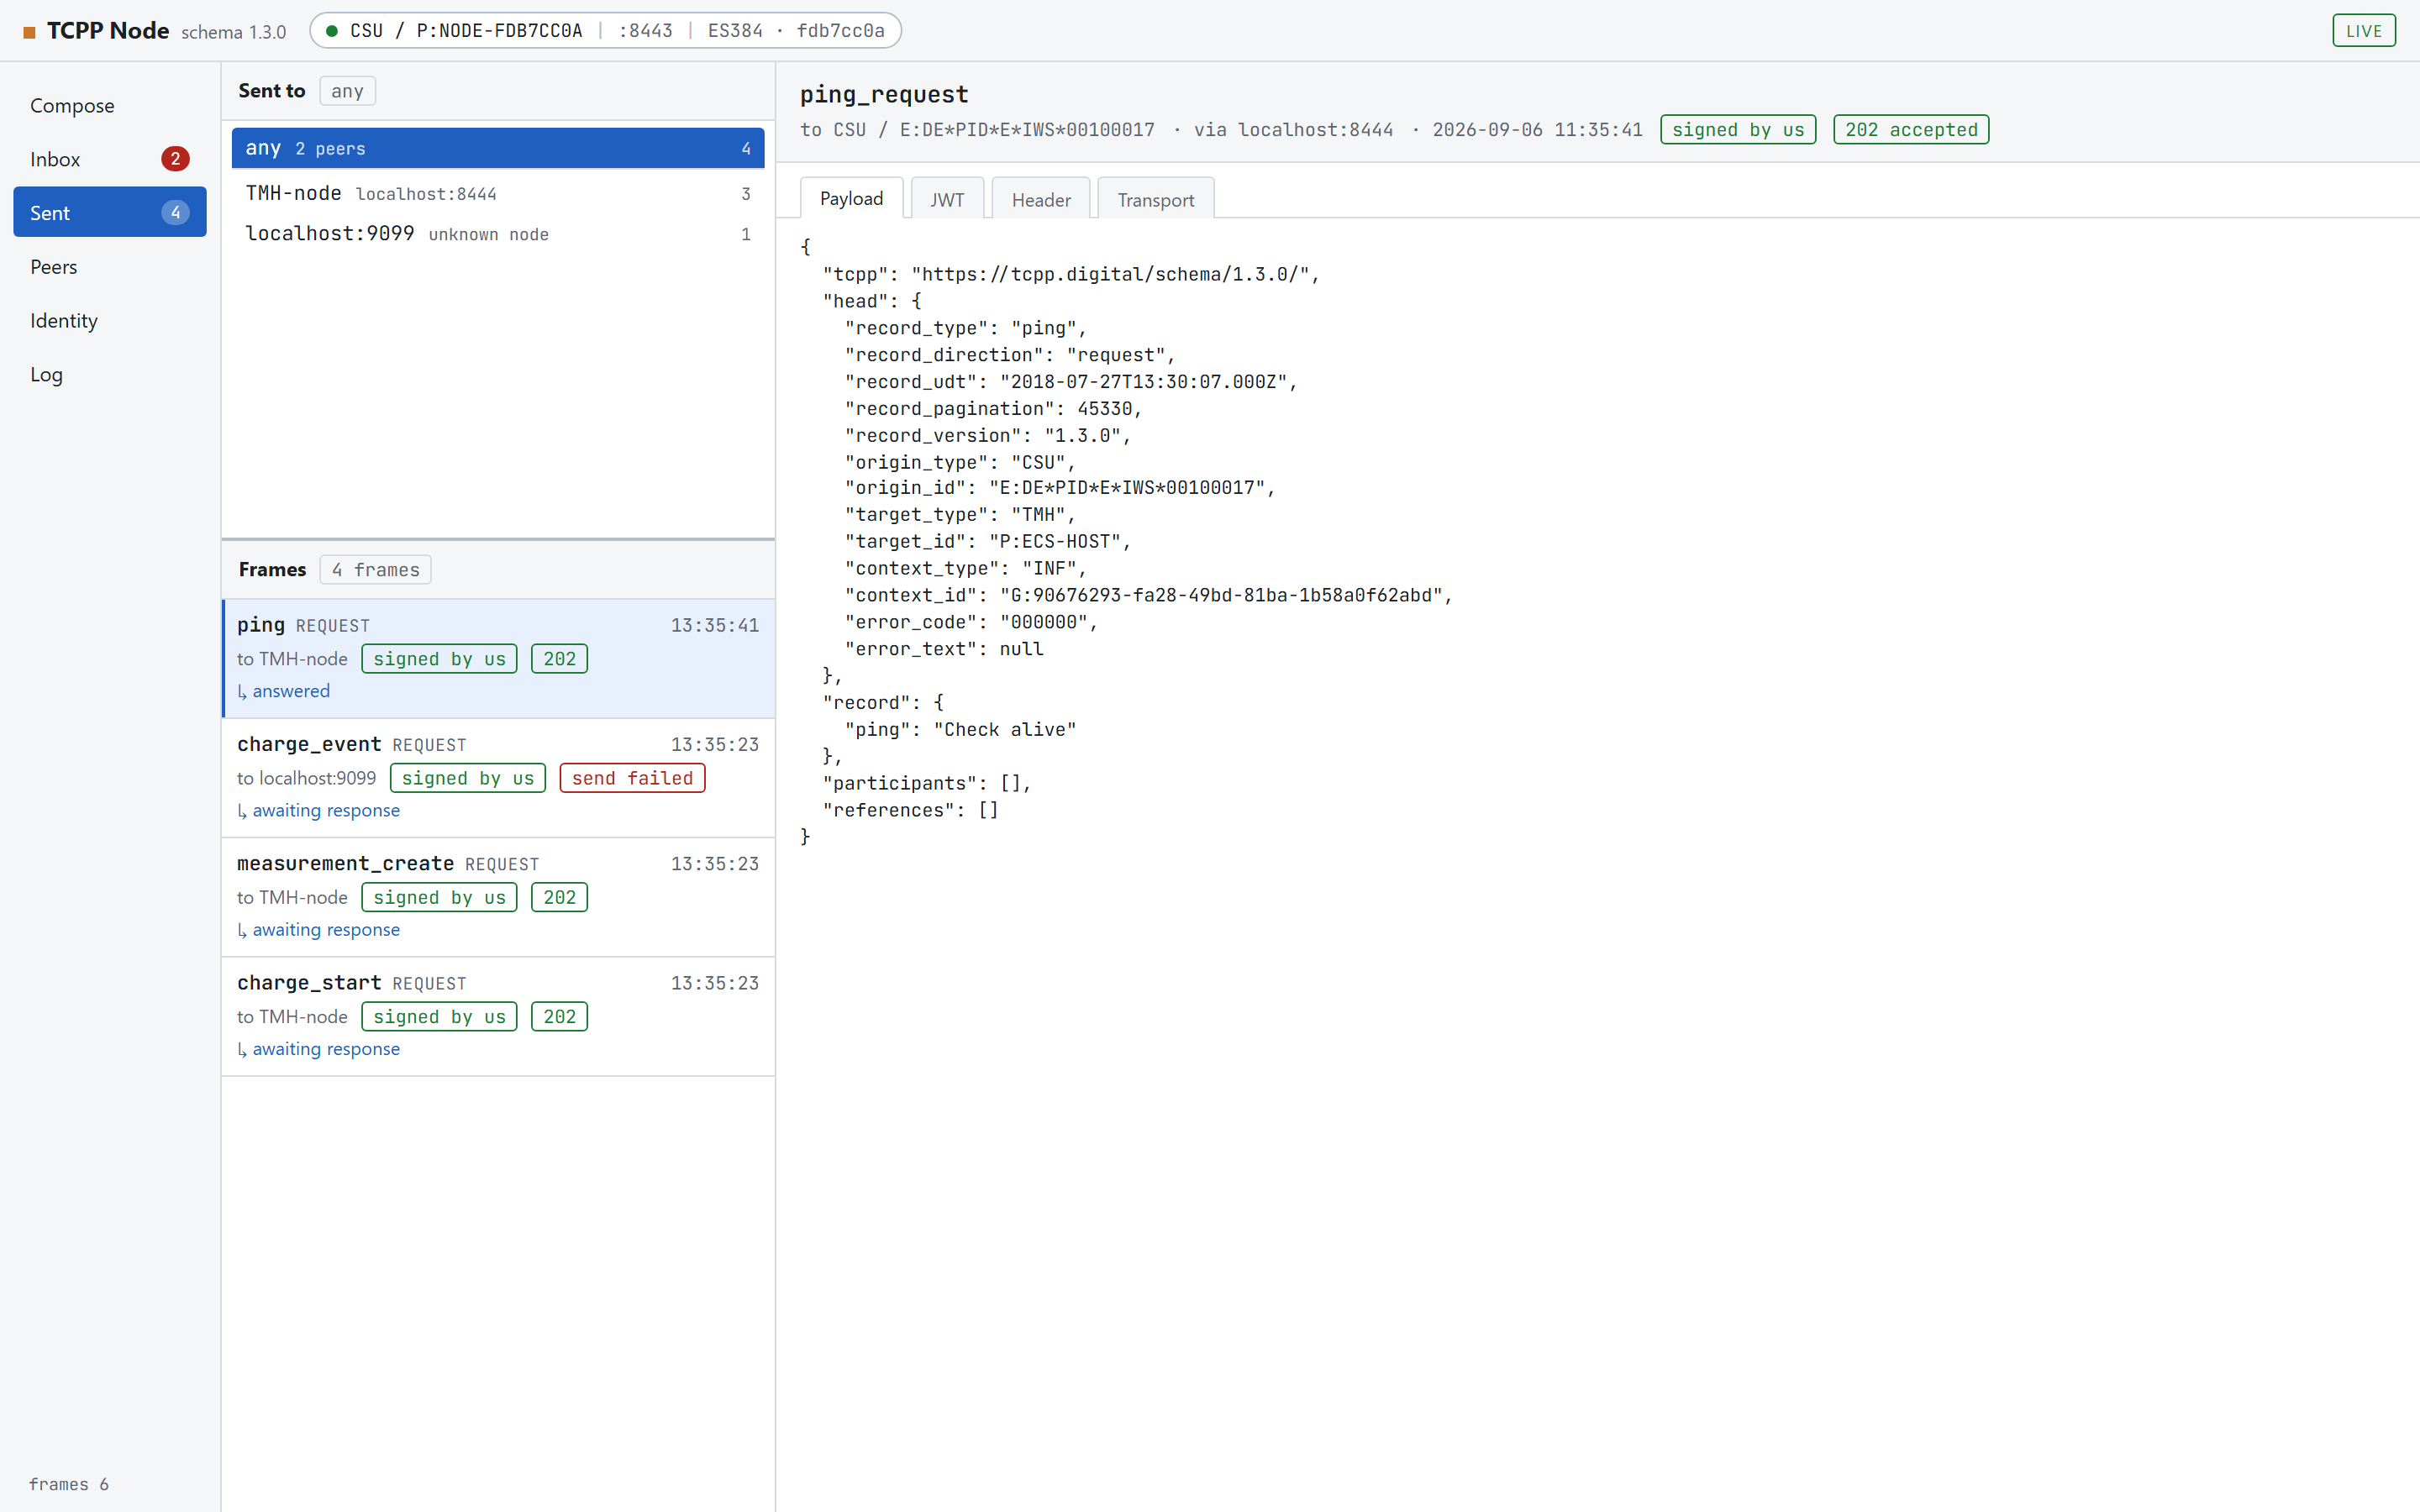
Sent
Sent is the same layout for outgoing frames. There are no unread
marks; what matters here is whether delivery worked.
Outgoing frames. signed by us on all of them,
202 where the peer accepted, and
send failed where nothing was listening.
A frame is recorded whether or not it was delivered, so a failed send leaves a full
record, token included, and the reason sits in the Transport tab.
Once the answer arrives, the request picks up its ↳ answered line.
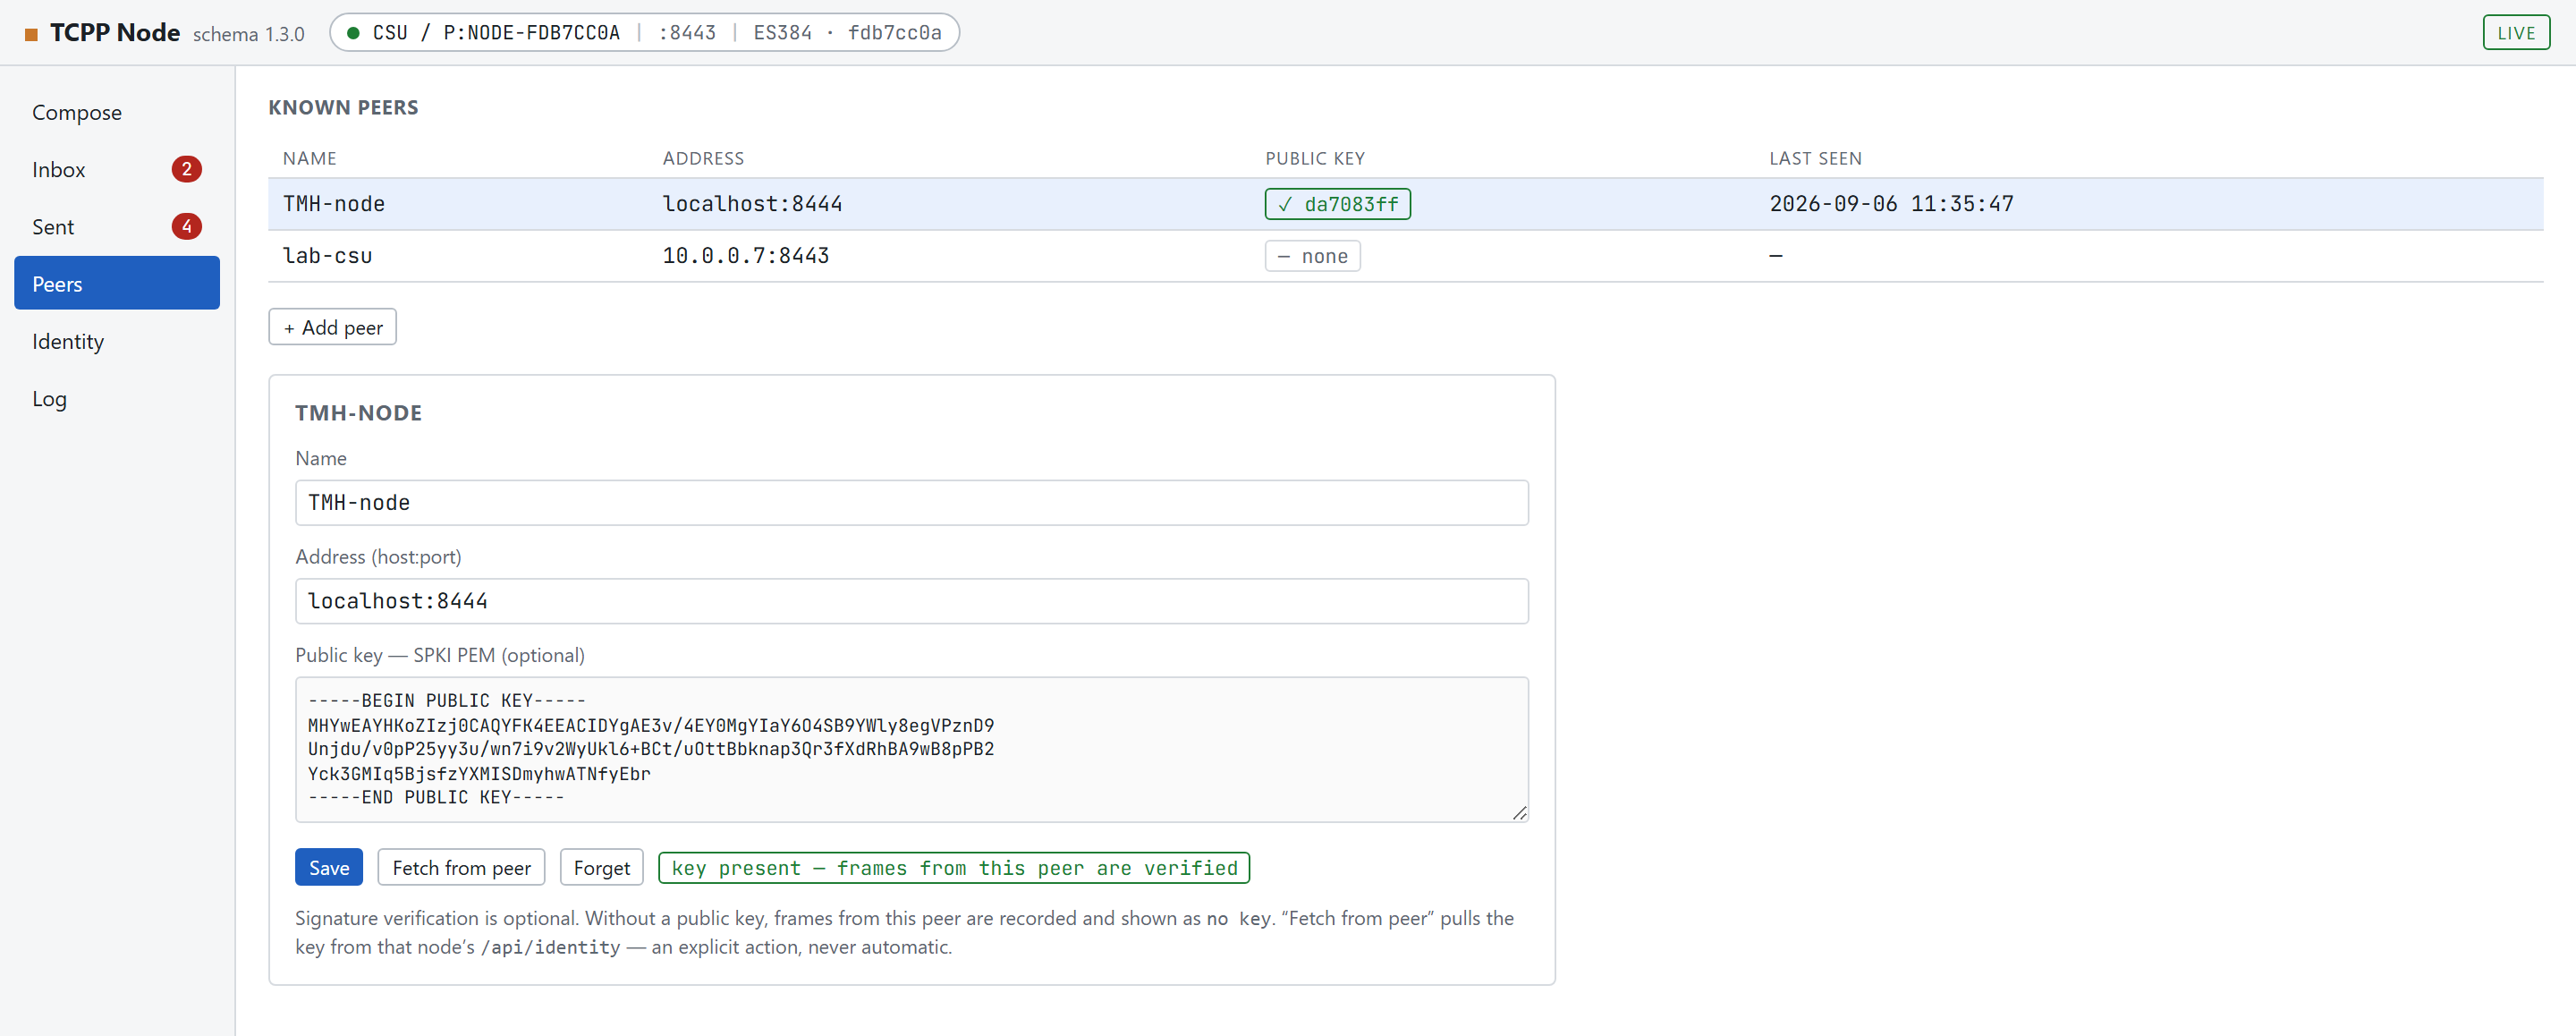
Peers and verification
A peer is a node you have exchanged frames with, or one you added yourself: a name, a
host:port, and optionally its public key. Peers appear on their own the first
time a frame passes in either direction, but never with a key. Supplying the
key is always a deliberate act.
Two peers: one whose key has been fetched, one that has never been contacted. Selecting
a row opens it in the card below.
Giving a peer its key
Select the peer in the table, or press + Add peer and fill in a name and address.
Either paste its SPKI PEM into the key box, or press Fetch from peer to pull it from that node's /api/identity. The peer must be saved before it can be fetched from.
Press Save. Every stored frame from that peer is re-checked immediately, and the badge under the box turns green.
The PEM to paste is on the other node's Identity screen, behind
Copy PEM. Forget removes the peer; the
frames it sent stay in the log and fall back to no key.
What the badges mean
Badge
Meaning
signature ✓
The token verifies against the key stored for this peer.
signature ✗
It does not. The frame was still recorded; look at it.
no key
No key is configured for this peer, so nothing was checked.
unverified
Not checked, for example a frame whose token could not be parsed.
signed by us
This node signed it. Shown on everything under Sent.
Verification is optional; signing is not
A frame from a peer with no key is recorded and displayed, not rejected; you can run a
whole lab without configuring a single key. Signing, on the other hand, always happens:
every frame this node sends is an ES384 JWS.
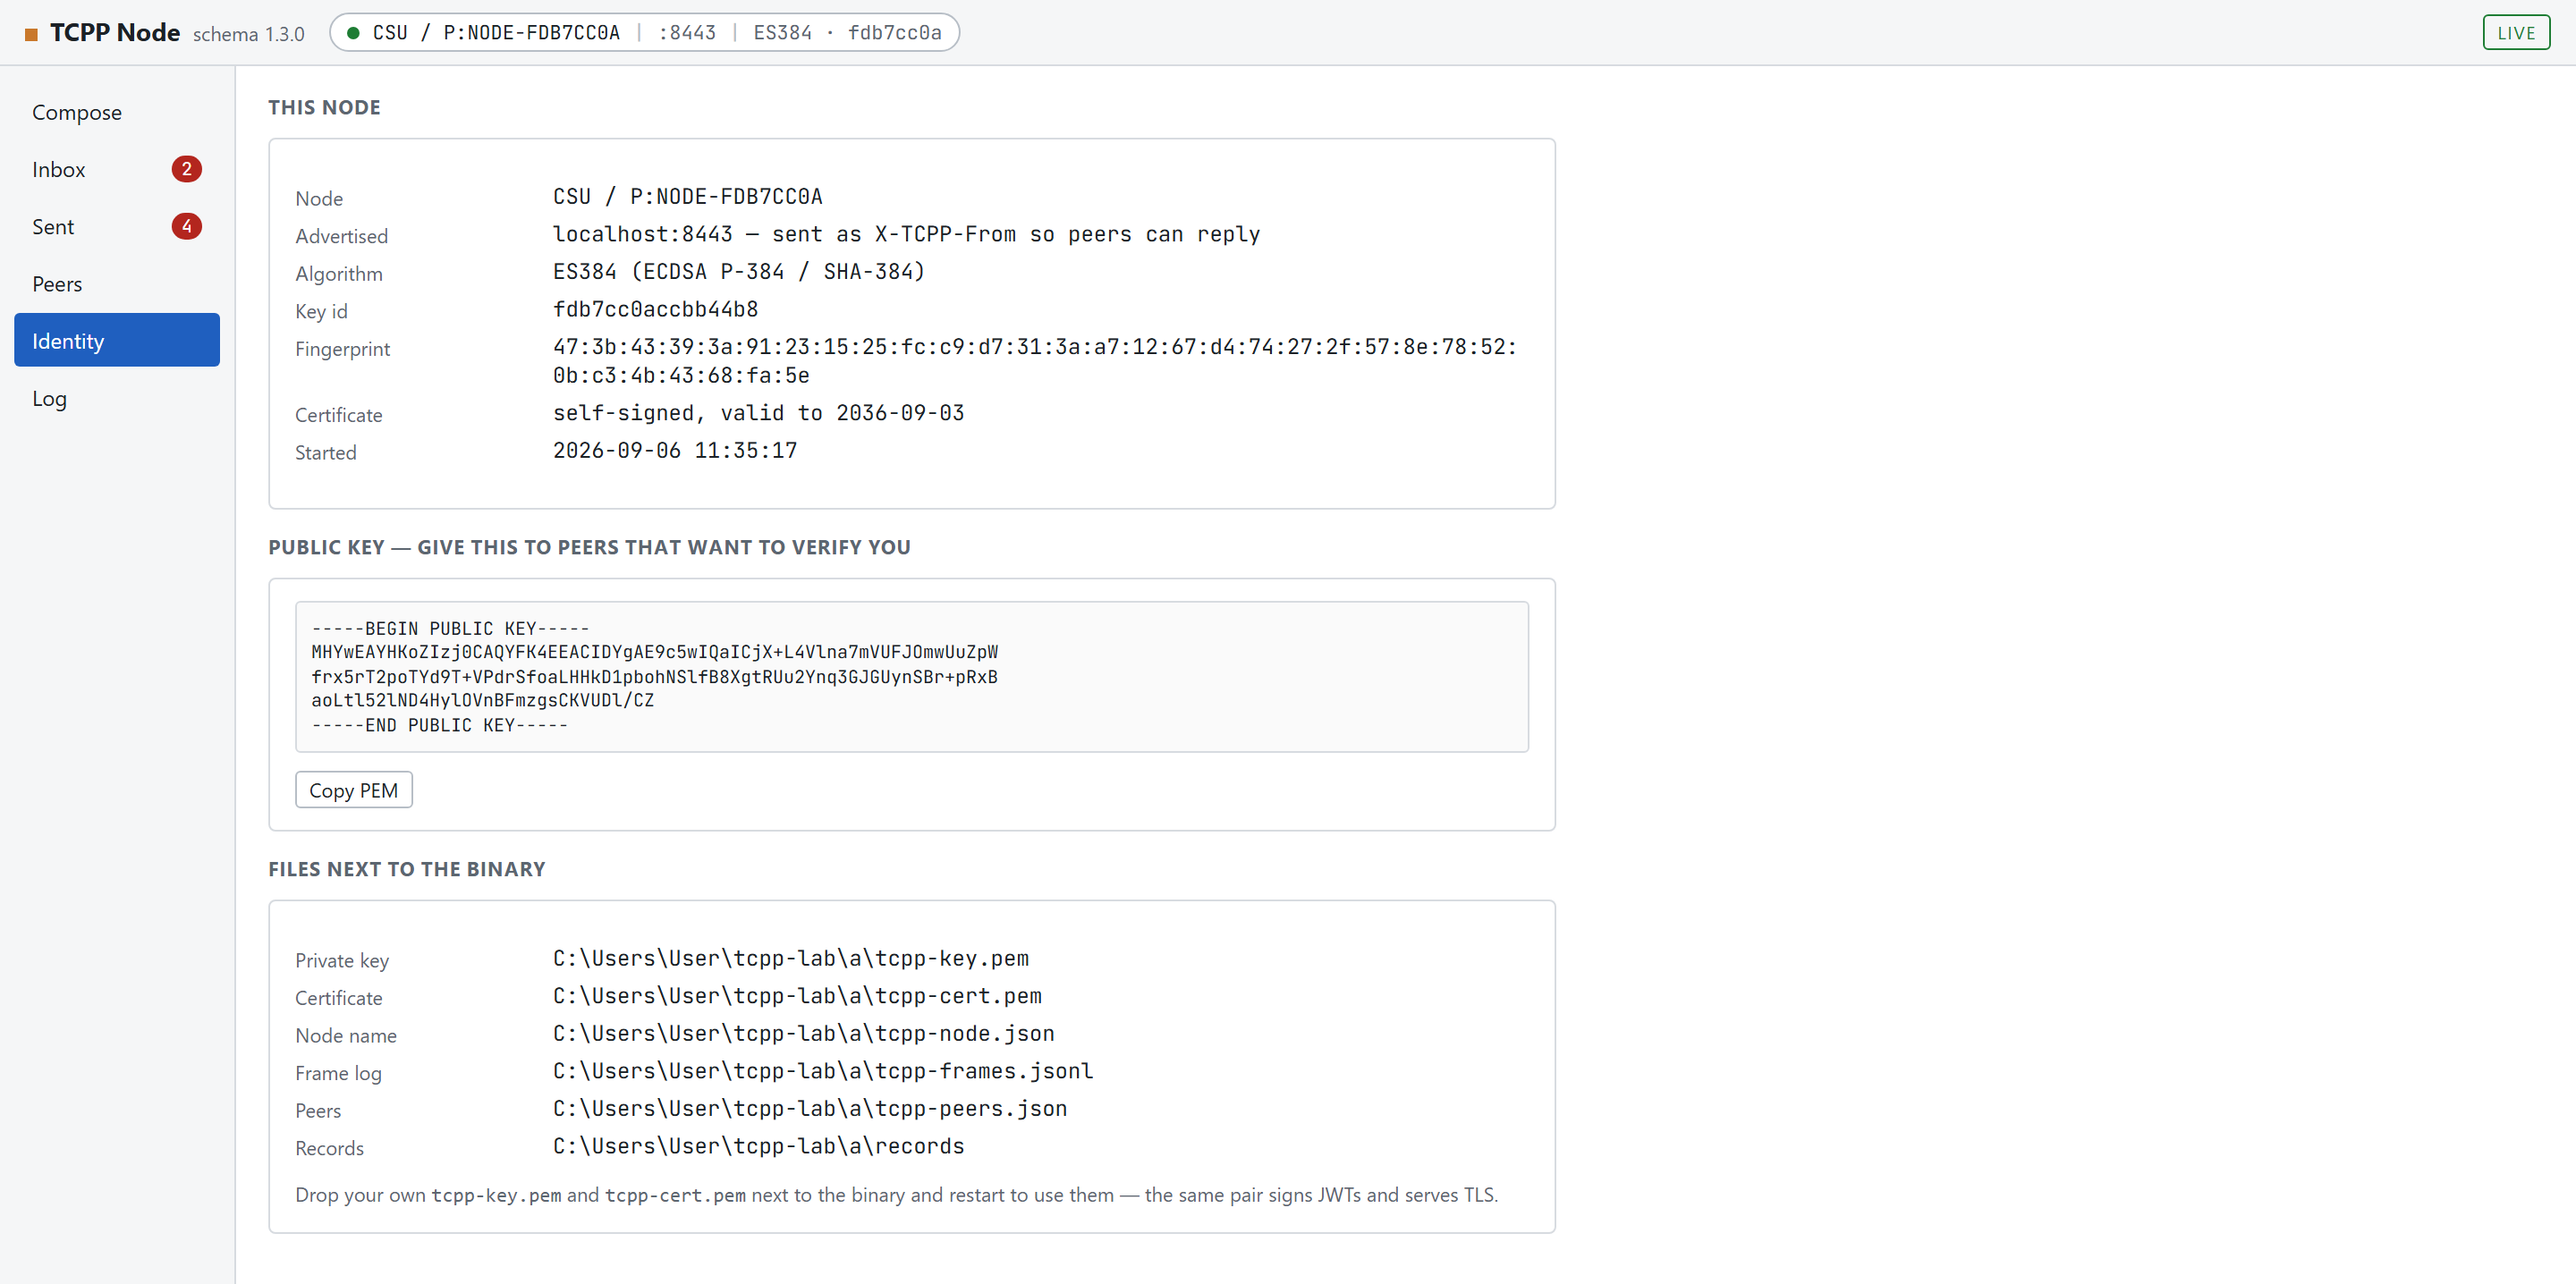
Identity
Everything this node is, and where it keeps it.
Node
The TCPP module type and id this node signs and speaks as.
Advertised
The address sent to peers as X-TCPP-From so they know where to reply. Change it with --advertise when peers reach you by another name.
Algorithm
Always ES384: ECDSA on P-384 with SHA-384.
Key id
Derived from the public key. Its first eight characters appear in every token's JOSE header, which is how you tell at a glance which key signed a frame.
Fingerprint
SHA-256 over the certificate, for comparing out of band.
Certificate
Self-signed, ten years, generated on first run.
The middle card holds the public key to hand to anyone who wants to verify this node;
Copy PEM puts it on the clipboard. The bottom card lists the six
paths from Getting started, resolved.
Bringing your own key
The same pair signs JWTs and terminates TLS, so using your own identity is just dropping
tcpp-key.pem and tcpp-cert.pem next to the binary and
restarting. A key with no certificate gets a fresh certificate derived from it. A
certificate that does not match the key is a startup error rather than a silent
inconsistency, and a certificate without its key is refused outright, because a
certificate cannot sign anything.
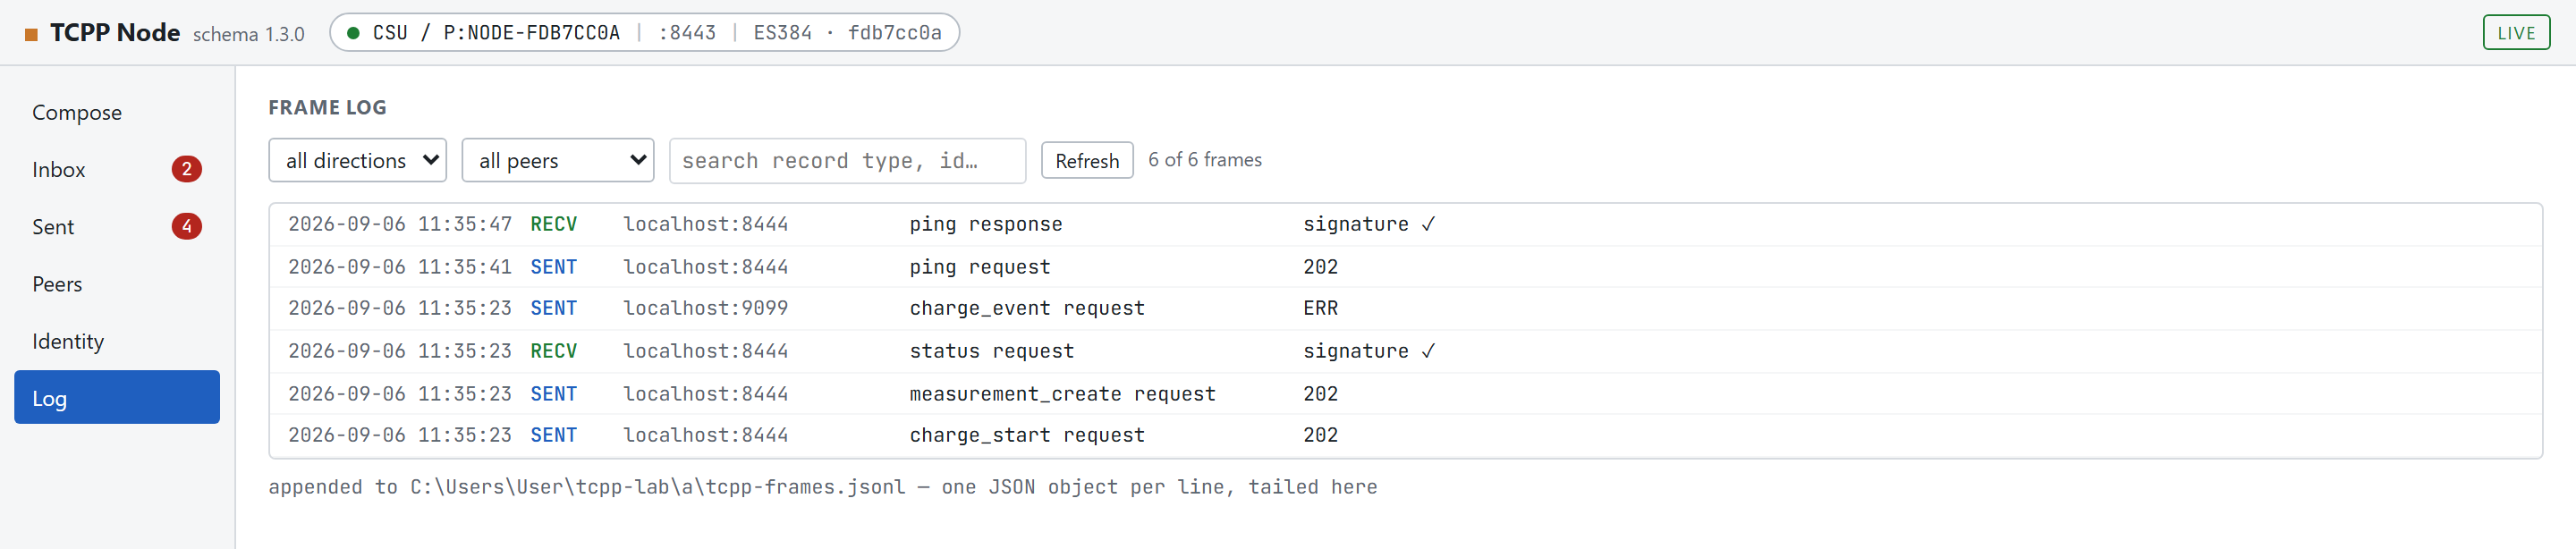
Log
Both directions in one place. The line at the bottom names the file these lines are
tailed from.
Each line is a timestamp, SENT
or RECV, the peer
address, the record type and direction, and a state column: the HTTP status or
ERR for outgoing frames, the verification result for incoming ones. Filter by
direction or peer, search across record type, origin, target and frame id, and press
Refresh to pull the list again.
The file behind it
tcpp-frames.jsonl is append-only: one JSON object per line, never rewritten,
recording the verification state as it was at that moment. On start the node
replays the last --log-tail lines (500 by default) so correlation and history
survive a restart, re-checking signatures against the keys you hold now. Nothing is unread
after a restart. Lines it cannot parse are skipped with a warning rather than stopping the
node.
Workflows
A. Send your first request
Open Compose and select ping in the schema list.
Press Load… and pick example. The form fills and the badge turns valid.
Edit anything you like; origin_id and target_id are the usual first stops.
Check Send to. It holds the default target; the dropdown offers known peers.
Press Sign & Send. ✓ 202 accepted means the peer took it.
Open Sent to see the frame, its token and its transport result.
B. Answer a request that arrived
On the receiving node, open Inbox. Unread frames carry a filled dot and the rail badge counts them.
Select the frame. It is marked read and opens on the right.
Read it on Payload; check who signed it with the badge in the header line.
Scroll down to Reply. The response is pre-filled from the request; fill in the parts that carry your answer.
Confirm the return address, then press Sign & Send response.
Back on the first node the response arrives in its inbox, and its request now reads ↳ answered.
C. Turn no key into signature ✓
Open Peers and select the peer, or add it with its host:port.
Give it a name you will recognise in the frame lists, and press Save.
Press Fetch from peer (or paste the PEM from that node's Identity screen) and Save again.
Go back to Inbox: every frame that peer ever sent now reads signature ✓. Verification is recomputed over the whole stored log, not just new arrivals.
D. Keep a payload you will need again
Compose the request until it says what you want.
Press Save…, give it a name (lab ping, ac-start-berlin), press Save.
It appears under Load… marked saved, and on disk at records/<schema>/<name>.json.
Records are plain files. Copy the directory to another node and its library comes with it.
E. Test what a peer does with a bad message
Load a record, then break one field on purpose: an id that fails its pattern, a required field emptied.
The field turns red and the badge counts the issue. Send it anyway.
On the receiving node the frame is recorded like any other; what its operator sees is exactly what your peer implementation would see.
An unparseable token is recorded too, marked unverified, and answered with 400 instead of 202.
F. Move a node, or give it a new identity
To move a node, stop it and copy its whole directory. Key, certificate, name, log, peers and records all travel together, so it comes back as the same node.
To hand it a new identity, drop your tcpp-key.pem and tcpp-cert.pem in and restart.
To have a fresh one generated, delete both files and restart; the node id is derived from the new key.
Check what it became with ./tcpp-node --print-identity, then give the printed PEM to the peers that verify you.
The key is the node
tcpp-key.pem is a secret and it is not recoverable. A new key means a new
key id and a new node id, and every peer that verifies you has to be given the new
public key.
Command line and files
Flags
There are no subcommands and no environment variables; flags and the files on disk are the whole configuration. Both -flag and --flag work.
Flag
Default
Meaning
--port
8443
TLS port to listen on.
--data-dir
beside the binary
Where the key, certificate, log, peers and records live.
--advertise
localhost:<port>
Address peers should reply to, sent as X-TCPP-From.
--peer
localhost:<port>
Default target pre-filled in the browser. The default is this node itself.
--node-type
CSU, or the stored value
Three uppercase letters. Persisted after the first run.
--node-id
derived from the key
3–120 characters. Persisted after the first run.
--hosts
none
Extra certificate host names or IPs, comma separated.
--log-tail
500
Frames replayed from the log at startup.
--insecure-peers
true
Accept peers' self-signed certificates. Turn off with --insecure-peers=false.
--print-identity
false
Create or load the identity, print it and exit without listening.
The certificate a node generates always covers localhost,
127.0.0.1, ::1 and the machine's host name; anything else peers
will use to reach it belongs in --hosts.
Keep one node per directory
Two copies of the binary started in the same directory would share one key,
one frame log and one record library, and the second would fail to take the port. Give
each node its own directory, or its own --data-dir.
--print-identity
$ ./tcpp-node --print-identity
node        CSU / P:NODE-74734B2A
alg         ES384
kid         74734b2a3dc9c8f9
fingerprint 48:81:2b:67:07:83:91:d7:ce:59:20:9a:83:0c:07:fa:ac:0f:da:f0:6a:da:02:6c:54:09:ca:b6:1d:1d:5e:54
key         C:\Users\User\tcpp-lab\a\tcpp-key.pem
cert        C:\Users\User\tcpp-lab\a\tcpp-cert.pem (valid to 2036-08-31T16:33:05Z)

-----BEGIN PUBLIC KEY-----
MHYwEAYHKoZIzj0CAQYFK4EEACIDYgAEnfz9/7TBzZv7NCAdmkGv+KzYUVnfVeum
amuA/gGEdCStd2Tm7X1JJALLWPYN7dJ9LzNIx4qNPUIMiRyOKZkif28Zvl6iuRTr
+voCuitlwh+WBuGNBFiCSvFQcFbfjDpy
-----END PUBLIC KEY-----
It creates the identity if there is none, which makes it a convenient way to provision a node before its first start.
Running and stopping
The node runs in the foreground and logs to standard error. Ctrl+C (or
SIGTERM) shuts it down gracefully within five seconds. It exits 0
on a clean shutdown and 1 after printing tcppnode: <reason>,
be it a port already in use, a data directory it cannot write, or a certificate that
does not match its key.
What to back up
tcpp-key.pem and tcpp-cert.pem are the identity and cannot be
regenerated. tcpp-node.json, tcpp-peers.json and
records/ are configuration worth keeping.
tcpp-frames.jsonl is history: it grows forever and can be rotated when it
gets inconvenient; the node only ever reads its tail.
HTTP API
The browser application is an ordinary client of the node's own HTTP interface, so
anything it does can be scripted. All of it is served over TLS on the node's single port.
No authentication
None of these routes require credentials, and there are no origin checks. Treat reachability
as full control of the node.
Node to node
Route
Meaning
POST /tcpp
The body is a compact JWS, Content-Type: application/jwt, up to 1 MB. Send X-TCPP-From so the receiver can reply and X-TCPP-Node to name yourself. Answers 202 with {"received":"<frame id>","node":"<label>"}, or 400 if the token cannot be read, in which case the frame is still recorded.
Browser
Route
Returns
GET /
The web application, embedded in the binary.
GET /schema/1.3.0/{name}
One embedded schema, as application/schema+json. A .json suffix is accepted.
GET /api/identity
Node type and id, label, advertised address, default peer, public key PEM, kid, fingerprint, certificate expiry, file paths, start time, frame and unread counts.
GET /api/catalog
Every endpoint with its request and response schema names and example variants.
GET /api/example/{base}[/{variant}]
One shipped example payload. Omitting the variant means example.
POST /api/send
Signs and delivers. Body {"peer":"host:port","message":{…},"in_reply_to":"<frame id>"}. Always 200, with ok, the recorded frame, the jwt and a transport object; error is present when delivery failed.
GET /api/frames
Frame list plus per-peer counts and totals. Filters: ?direction=sent|received, ?peer=host:port, ?limit=n.
GET /api/frames/{id}
One frame in full: payload, token, decoded JOSE header, and the reply schema when there is one.
POST /api/frames/{id}/read POST /api/frames/read
Mark one frame, or all of them, read.
POST /api/frames/{id}/verify
Re-check a signature. An optional body {"public_key_pem":"…"} checks against a key you supply instead of the stored one.
GET /api/peers
Known peers with name, address, key state, kid, node id, last seen.
PUT /api/peers
Create or update: {"name","address","public_key_pem","node_id","rename"}. Saving re-verifies every stored frame from that peer.
DELETE /api/peers/{name}
Forget a peer.
POST /api/peers/{name}/fetch-key
Read the peer's /api/identity and store its public key.
GET /api/records/{schema}
The records stored for one schema, each with shipped, modified, size.
GET /api/records/{schema}/{name}
One record, byte for byte as stored.
PUT /api/records/{schema}/{name}
Store one record. The body is the raw JSON payload, up to 1 MB.
The node's certificate is self-signed, so a client has to be told to accept it.
# the node's own identity
curl -k https://localhost:8443/api/identity

# send a stored record to a peer
curl -k -X POST https://localhost:8443/api/send \
  -H 'content-type: application/json' \
  -d "{\"peer\":\"localhost:8444\",\"message\":$(curl -sk https://localhost:8443/api/records/ping_request/example)}"

# what has arrived
curl -k 'https://localhost:8443/api/frames?direction=received&limit=10'
/api/send signs the message exactly as you hand it over, key
order included, and a receiver reads it back verbatim. That is deliberate: a signature
covers bytes, not an abstract object, so nothing is allowed to re-serialise a message
between signing and verification.
The TCPP message
TCPP is the protocol these schemas define: a JSON envelope exchanged between charge
infrastructure modules. This manual's version is 1.3.0, and every message
names it in its first field.
{
  "tcpp": "https://tcpp.digital/schema/1.3.0/",
  "head": {
    "record_type":       "ping",
    "record_direction":  "request",          request | response | internal
    "record_udt":        "2018-07-27T13:30:07.000Z",
    "record_pagination": 45330,              counts up, 1 to endless
    "record_version":    "1.3.0",
    "origin_type":       "CSU",              three letters, the sending module
    "origin_id":         "E:DE*PID*E*IWS*00100017",
    "target_type":       "TMH",
    "target_id":         "P:ECS-HOST",
    "context_type":      "INF",              the process, not the module
    "context_id":        "G:90676293-fa28-49bd-81ba-1b58a0f62abd",
    "error_code":        "000000"            hex; 000000 = no error
  },
  "record":       { "ping": "Check alive" }, shape depends on record_type
  "parsed":       { },                       responses only: an error code per element
  "participants": [ ],                       controls outgoing communication
  "references":   [ ]                        a response carries the request's head here
}
Ids carry their namespace
Every id starts with a two-character prefix saying what kind of identifier follows.
Prefix
Meaning
Prefix
Meaning
E:
EVSEID / EMAID
G:
GUID
D:
domain namespace
H:
hash
P:
private namespace
N:
numeric pagination
I:
internal
C:
contract / tariff id
V:
VID
X:
undefined
A node that generates its own id uses the private namespace, which is why the lab nodes
are called P:NODE-9BED6853.
Module types
origin_type and target_type are three uppercase letters naming
the kind of module: TMH Trusted Management Host, TEH Trusted
Exchange Host, TAH Trusted Archive Host, MSP eMobility Service
Provider, CPO Charge Point Operator, CSU Charge Switch Unit,
EMU Energy Management Unit, and so on. A node announces its own with
--node-type.
How a request and its answer find each other
Every request has exactly one response. The responder copies the request's whole
head into references[0], and both nodes compute the same key from
it: record type, direction, timestamp, pagination, origin and target. That is how the
frame lists on both sides can say ↳ answered and
↳ answers an earlier request without either node keeping a session. When
you reply from the inbox the node also passes the frame id explicitly, so the pairing does
not depend on the timestamps surviving intact.
Signing
An outgoing frame is a compact JWS over the payload bytes, with the header
{"alg":"ES384","kid":"…","typ":"JWT"}. Two details are worth knowing because
they are where interoperable implementations usually go wrong:
Fixed-width R‖S. JWS wants the ECDSA signature as two 48-byte halves
(IEEE P1363), which is what the browser's Web Crypto produces. Go's
ecdsa.SignASN1 produces DER instead and must not be used; roughly one
signature in 256 has a short coordinate that needs left-padding.
The payload is signed as handed over.JSON.stringify
preserves key insertion order while Go's encoding/json sorts map keys, so a
message is never re-marshalled between signing and verification.
Appendix
The 27 endpoints
Each has a request and a response schema, served at
/schema/1.3.0/<base>_request.json and
…_response.json. Some ship more than one example, and each example becomes a
record you can load.
One TCPP message as this node saw it: token, decoded payload, direction, peer, verification state, transport result and correlation links.
Peer
Another node: a name, an address, and optionally a public key.
Record
A stored payload in the node's library, at records/<schema>/<name>.json.
Draft
Unsent form contents kept in the browser tab. Per schema on the compose form, per frame on the reply form.
Target
The host:port a frame is sent to.
kid
Key id, derived from the public key and carried in every token's header.
JWS / JWT
The compact signed form a frame travels in. Here always ES384.
About the figures
Every screenshot in this manual was taken from a running two-node lab, not drawn, so
what you see here is what the application does. They are captured by a script kept
alongside the manual's source, which drives a headless browser through the same steps an
operator takes, and they are retaken whenever the interface changes.